
Unless noted, trademarks are the property of Polaris Industries Inc.
QR Code® is a registered trademark of DENSO WAVE INCORPORATED. Nation Safe Drivers® is a registered trademark of NSD Holdings Inc. Brammo® is a registered trademark of Brammo Inc. MACPHERSON MACPHERSON RIDE® is a registered trademark of Aftermarket Auto Parts Alliance, Inc. Bluetooth® is a registered trademark of Bluetooth Sig, Inc. WD-40® is registered to WD-40 Manufacturing Company. Tread Lightly® is a registered trademark of the United States Department of Agriculture. OSHA® is a registered trademark of the Occupational Safety and Health Administration, U.S. Dept. of Labor.
Copyright 2021 Polaris Industries Inc. All information contained within this publication is based on the latest product information at the time of publication. Due to constant improvements in the design and quality of production components, some minor discrepancies may result between the actual vehicle and the information presented in this publication. Depictions and/or procedures in this publication are intended for reference use only. No liability can be accepted for omissions or inaccuracies. Any reprinting or reuse of the depictions and/or procedures contained within, whether whole or in part, is expressly prohibited.
The original instructions for this vehicle are in English. Other languages are provided as translations of the original instructions.
Thank you for purchasing a POLARIS vehicle, and welcome to our world-wide family of POLARIS enthusiasts. Be sure to visit us online at www.polaris.com for the latest news, new product introductions, upcoming events, career opportunities and more.
Here at POLARIS we proudly produce an exciting line of commercial products. We believe POLARIS sets a standard of excellence for all utility vehicles manufactured in the world today. Many years of experience have gone into the engineering, design, and development of your POLARIS vehicle, making it the finest machine we’ve ever produced.
For safe and enjoyable operation of your vehicle, be sure to follow the instructions and recommendations in this owner’s manual. Your manual contains instructions for minor maintenance, but information about major repairs is outlined in the POLARIS Service Manual and can be performed by a factory certified Master Service Dealer (MSD) technician.
Your POLARIS dealer knows your vehicle best and is interested in your total satisfaction. Your POLARIS dealership can perform all of your service needs during and after the warranty period.
For the most up-to-date owner’s manual visit https://www.polaris.com/en-us/owners-manuals.
The following signal words and symbols appear throughout this manual and on your vehicle. Your safety is involved when these words and symbols are used. Become familiar with their meanings before reading the manual.
DANGER indicates a hazardous situation which, if not avoided, WILL result in death or serious injury.
WARNING indicates a hazardous situation which, if not avoided, COULD result in death or serious injury.
CAUTION indicates a hazardous situation which, if not avoided, COULD result in minor to moderate injury.
NOTICENOTICE provides key information by clarifying instructions.
IMPORTANTIMPORTANT provides key reminders during disassembly, assembly, and inspection of components.
The Prohibition Safety Sign indicates an action NOT to take in order to avoid a hazard.

The Mandatory Action Sign indicates an action that NEEDS to be taken to avoid a hazard.

Please familiarize yourself with all laws and regulations concerning the operation of the vehicle in your area.
www.gemcar.com
Special precautions must be followed when owning and operating a battery-powered vehicle. This vehicle is not a toy and can be hazardous to operate. This vehicle handles differently than other vehicles. A collision or rollover can occur quickly, even during routine maneuvers, if you fail to take proper precautions.
Record your vehicle’s identification numbers in the spaces provided.
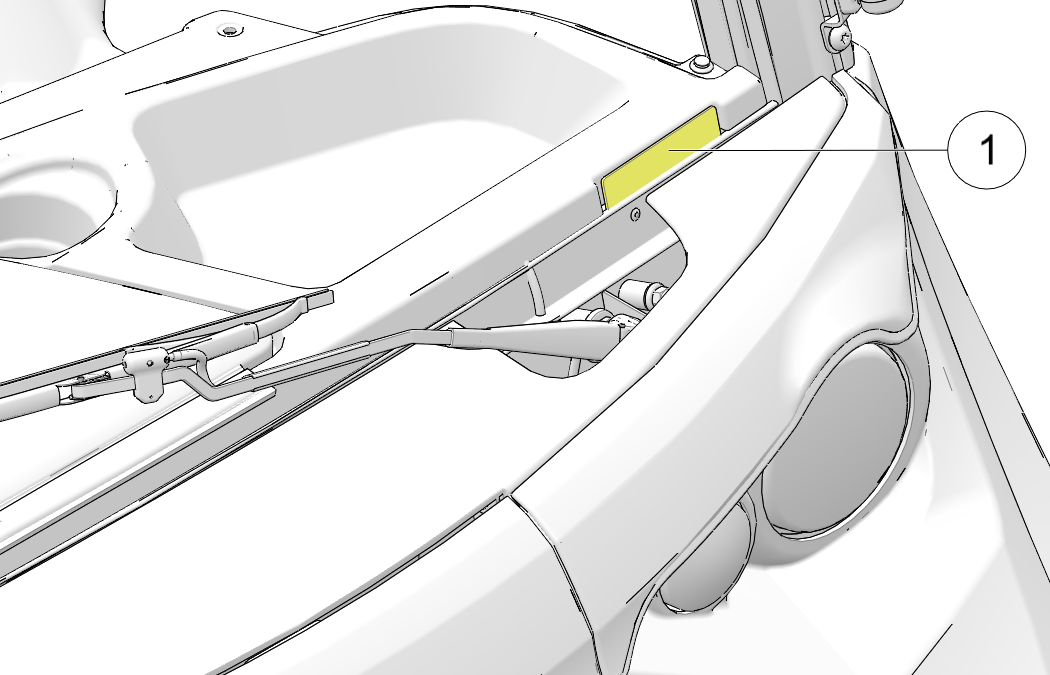
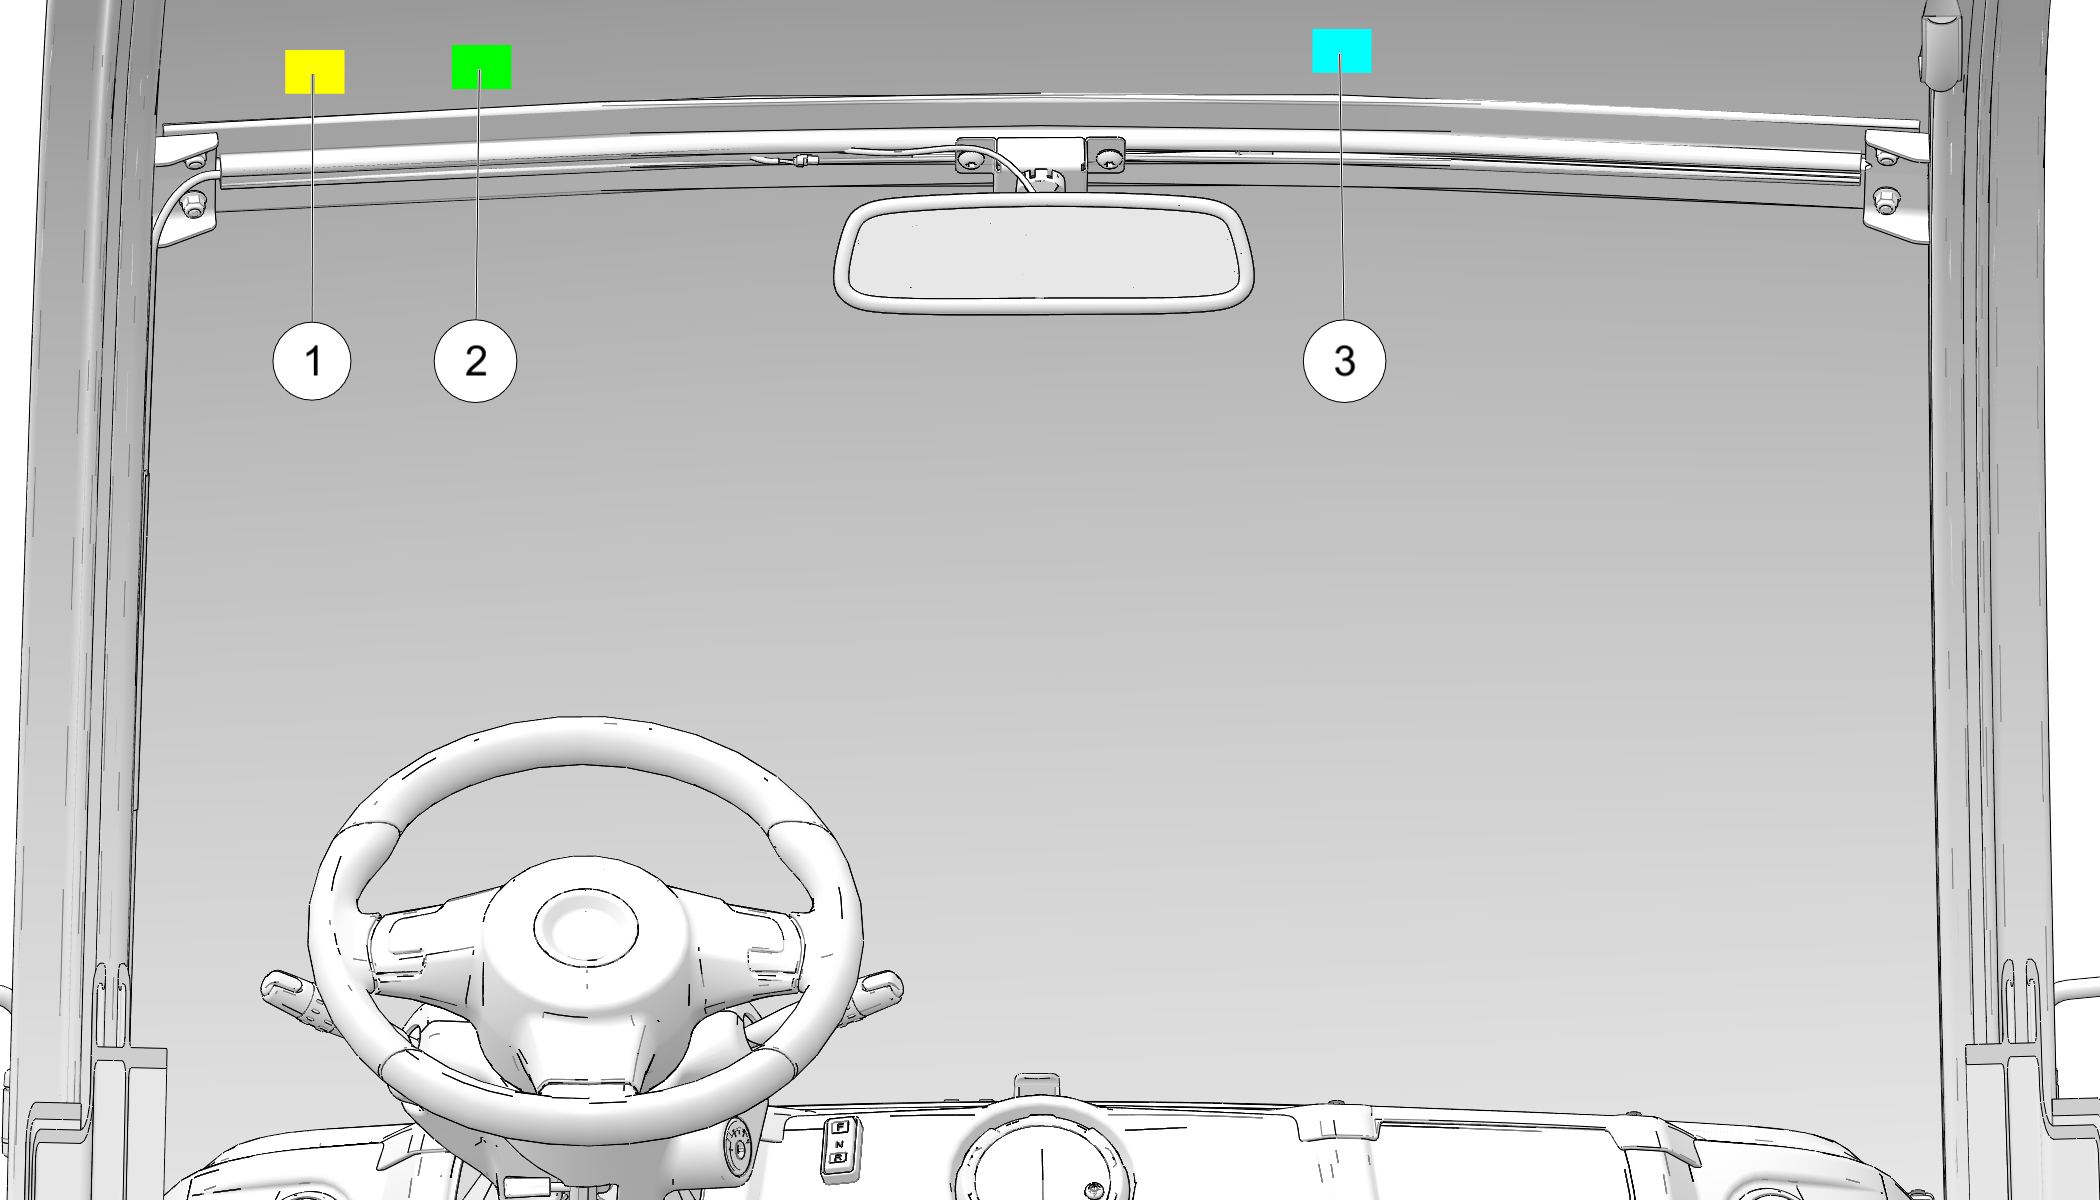
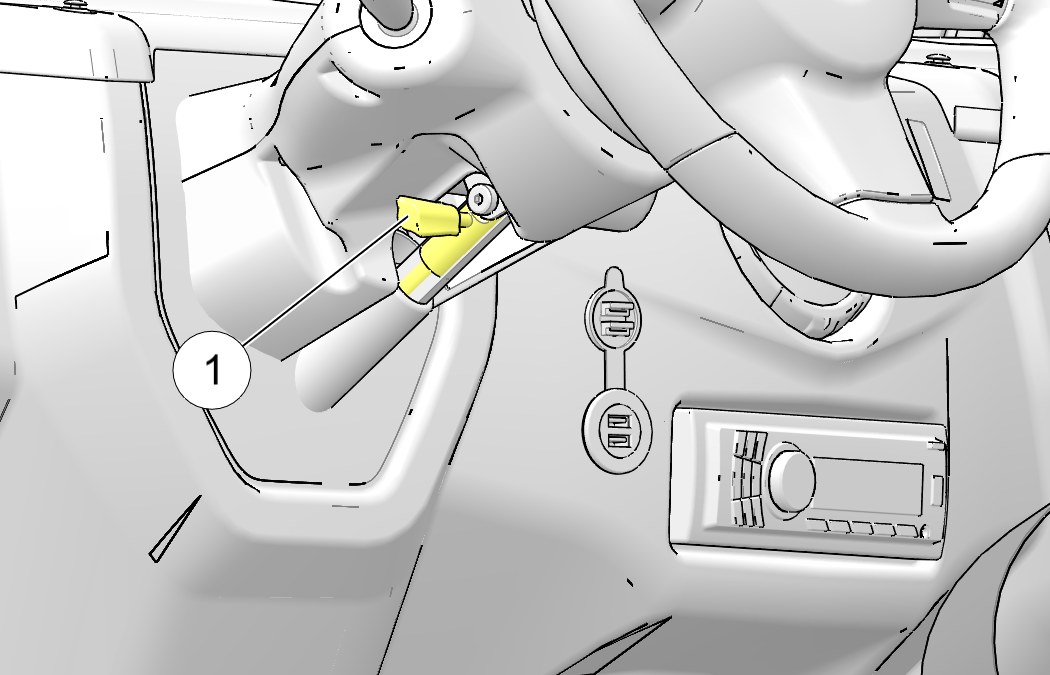
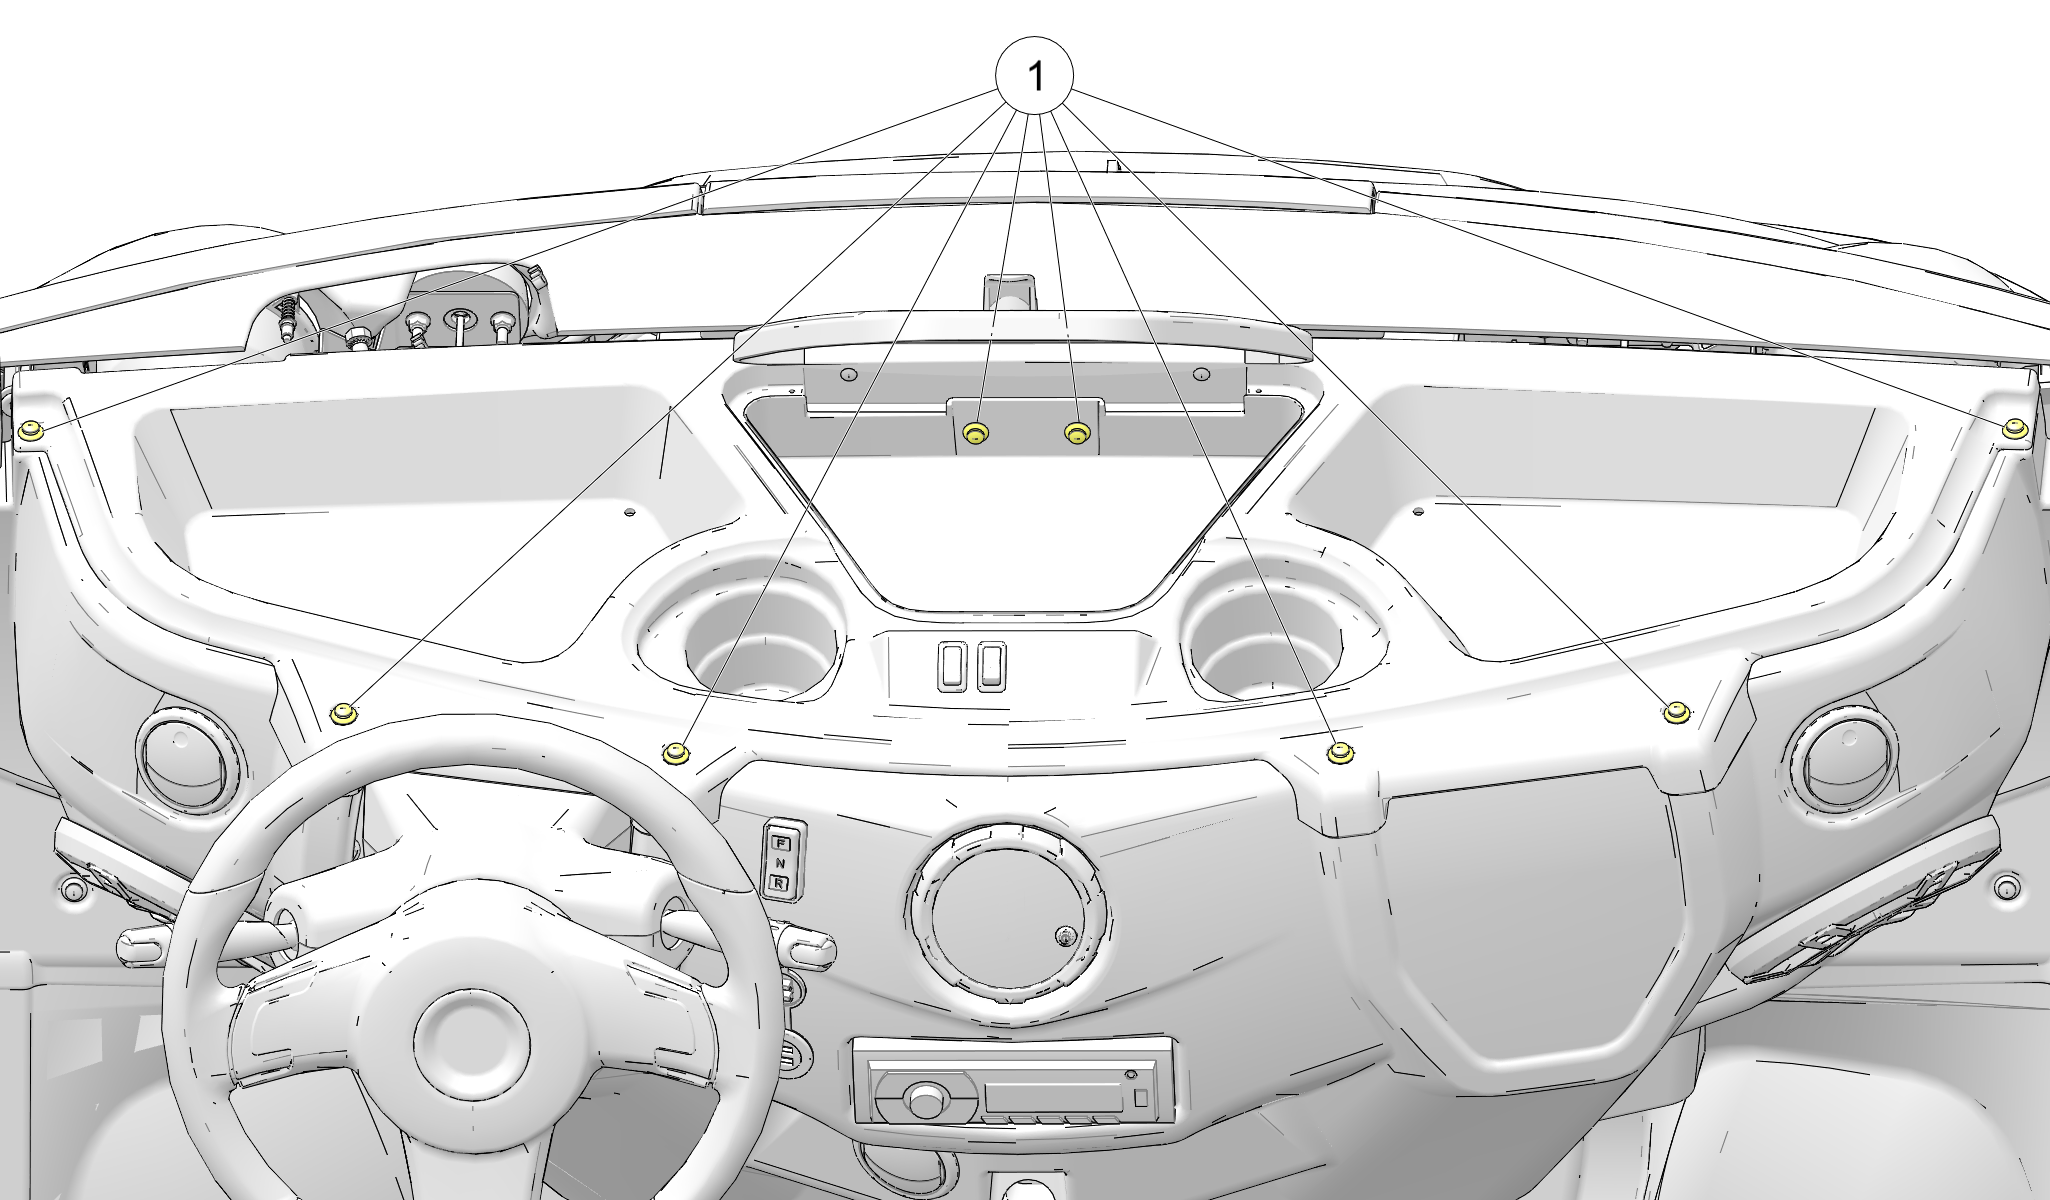
The Vehicle Identification Number (VIN) is stamped on a tag affixed to the left dash at the base of the windshield 1 . The VIN is also printed on the manufacturer’s label 1 , which is located on the left rear section of the interior roof panel.
The VIN indicates the model year, model type and serial number of your vehicle. The manufacturer’s label also contains the Gross Vehicle Weight Rating (GVWR) and Gross Axle Weight Rating (GAWR) information for your vehicle. Never exceed the GVWR or the GAWR. See Gross Vehicle Weight Rating (GVWR).

Vehicle Identification Number (VIN):
Vehicle Model Number:
The Vehicle Emission Control Information (VECI) label 2 is located on the left rear section of the interior roof panel, below the manufacturer’s label.
The following statements apply to radio components offered with this vehicle. These include but may not be limited to the touchscreen display.
This device complies with part 15 of the FCC Rules. Operation is subject to the following two conditions: (1) This device may not cause harmful interference, and (2) this device must accept any interference received, including interference that may cause undesired operation.
This device complies with FCC RF radiation exposure limits for general population.
This device contains license-exempt transmitter(s)/receiver(s) that comply with Innovation, Science and Economic Development Canada’s license-exempt RSS(s). Operation is subject to the following two conditions:
This equipment complies with part 15 of the Federal Communications Commission (FCC) rules.
These requirements are intended to provide reasonable protection against harmful interference in a residential installation. This equipment generates, uses and can radiate radio frequency energy and, if not installed and used in accordance with the instructions, may cause harmful interference to radio communications. However, there is no guarantee that interference will not occur in a particular installation.
If this equipment does cause harmful interference to radio or television reception, which can be determined by turning the equipment off and on, the user is encouraged to try to correct the interference by one or more of the following measures:
Changes or modifications to this equipment not expressly approved by the party responsible for compliance could void the user’s authority to operate the equipment.
For an extra or replacement key for the ignition or accessory locks, a blank can be ordered from any GEM Dealer. The necessary blank can be identified by providing the Vehicle Identification Number to your Dealer. The blank will be cut using your existing key to create a spare, but not all dealers are able to cut key blanks and it may need to be taken elsewhere to be cut. If both of your keys have been lost, the ignition will need to be replaced.
Your new GEM product is equipped with an Acoustic Vehicle Alerting System (AVAS). This system includes a noise emitting device designed in compliance with FMVSS-141 Minimum Sound Requirements for Hybrid and Electric Vehicles. The purpose of this device is to provide an audible alert to aid in pedestrian awareness of an active vehicle. The vehicle will emit a specific audible alert to enhance its ability to be detected during critical operating scenarios including: stationary, reverse and constant speeds up to 18.64 mph (30 kph) .
Warning labels have been placed on the vehicle for your protection. Read and follow the instructions of the labels on the vehicle carefully. If any of the labels depicted in this manual differ from the labels on your vehicle, always read and follow the instructions of the labels on the vehicle
If any label becomes illegible or comes off, contact your authorized GEM dealer to purchase a replacement. Replacement safety labels are provided at no charge. The part number is printed on the label.
The roof warnings and disclosures are located on the underside of the roof.
In accordance with the Onatario, Canada LSV program, warning label 7188616 will be placed by the dealer on models sold in Onatario to support Low Speed Vehicle Registration in this region. The recommended location for this label is on the left section of the interior roof panel.
| RATING | eL XD |
|---|---|
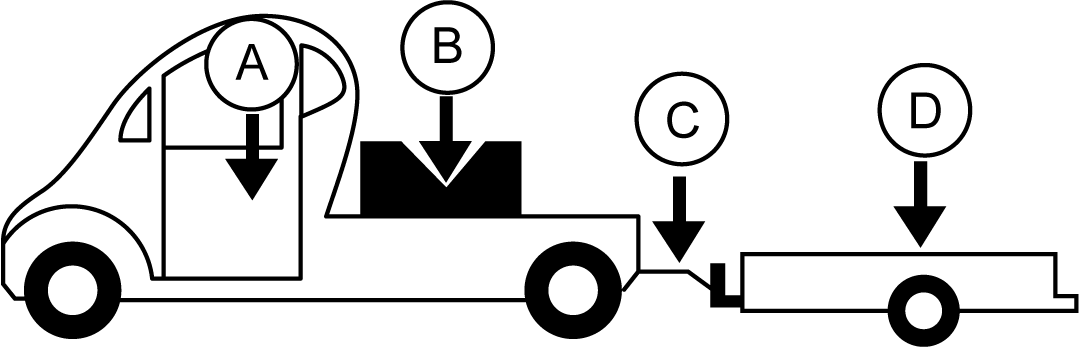
| A: Occupant Capacity | 300 lb (136 kg) |
| B: Cargo Capacity (includes cargo, bed load and optional equipment) | 1150 lb (499 kg) * |
| C: Maximum Trailer Tongue Weight | 150 lb (68 kg) |
| D: Maximum Gross Trailer Weight | 1100 lb (499 kg) |
| A + B = Vehicle Rated Capacity | 1450 lb (658 kg) |
| A + B + D, not to exceed stated Vehicle Combination Rated Capacity | 1450 lb (658 kg) * |
| Vehicle Dry Weight (Base Model) | 1585 lb (719 kg) |
| A + B + Vehicle Dry Weight = Maximum Gross Vehicle Weight | 2999 lb (1360 kg) |
| A + B + D + Vehicle Dry Weight, not to exceed stated Maximum Gross Vehicle Combination Weight | 2999 lb (1360 kg) |
| * Cargo Capacity and Vehicle Dry Weight are directly affected by the vehicles features, options & accessories and will be unique to each specific configuration. | |
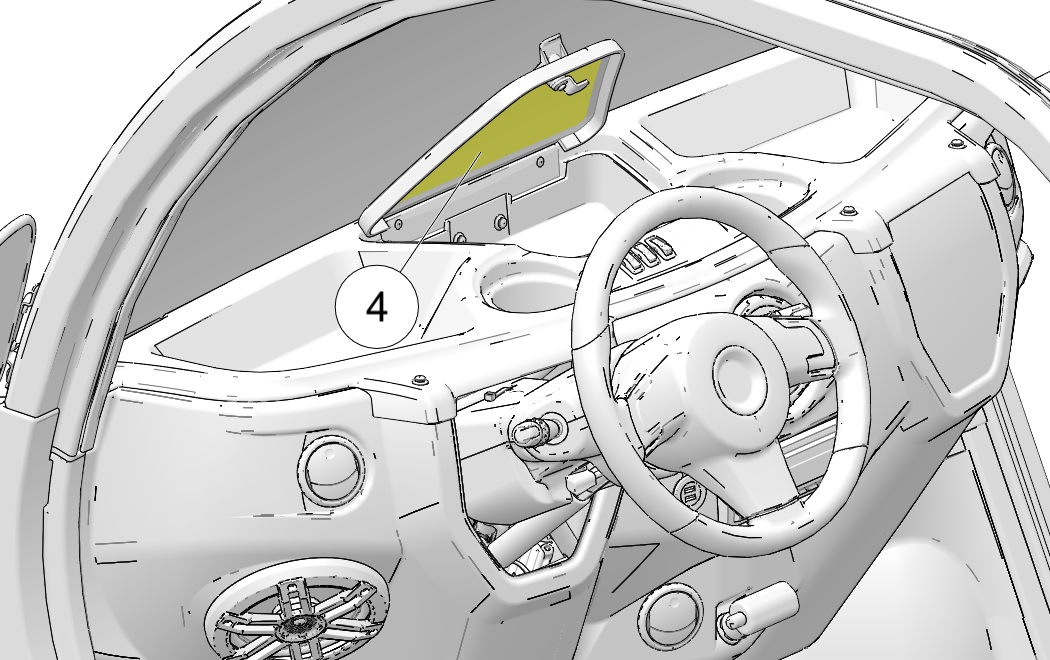
The rollover risk warning 4 is located on the underside of the glove box lid.
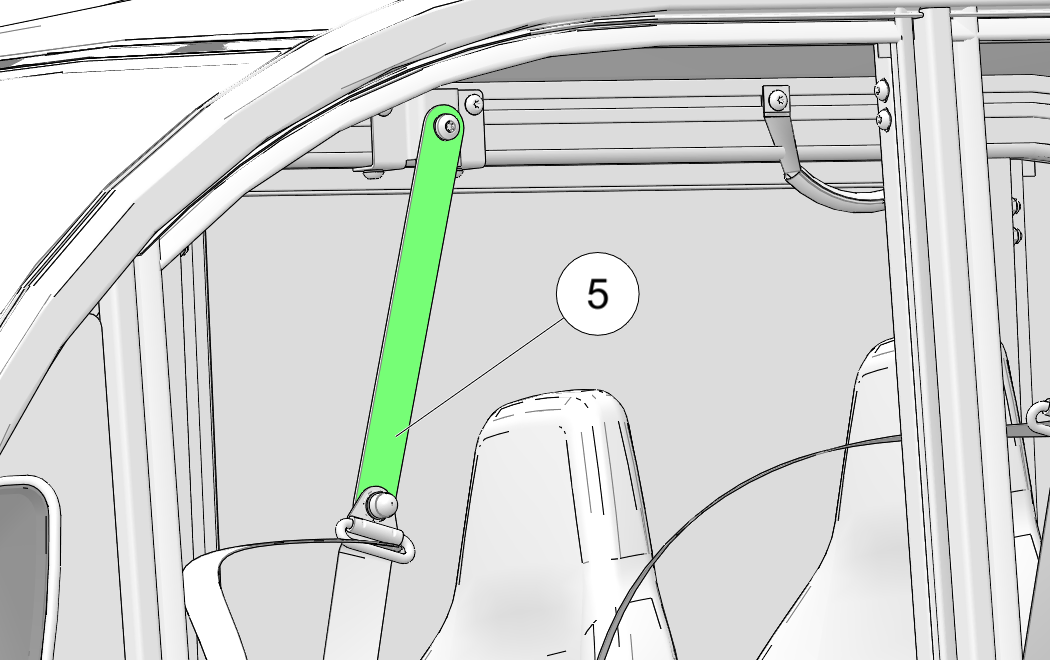
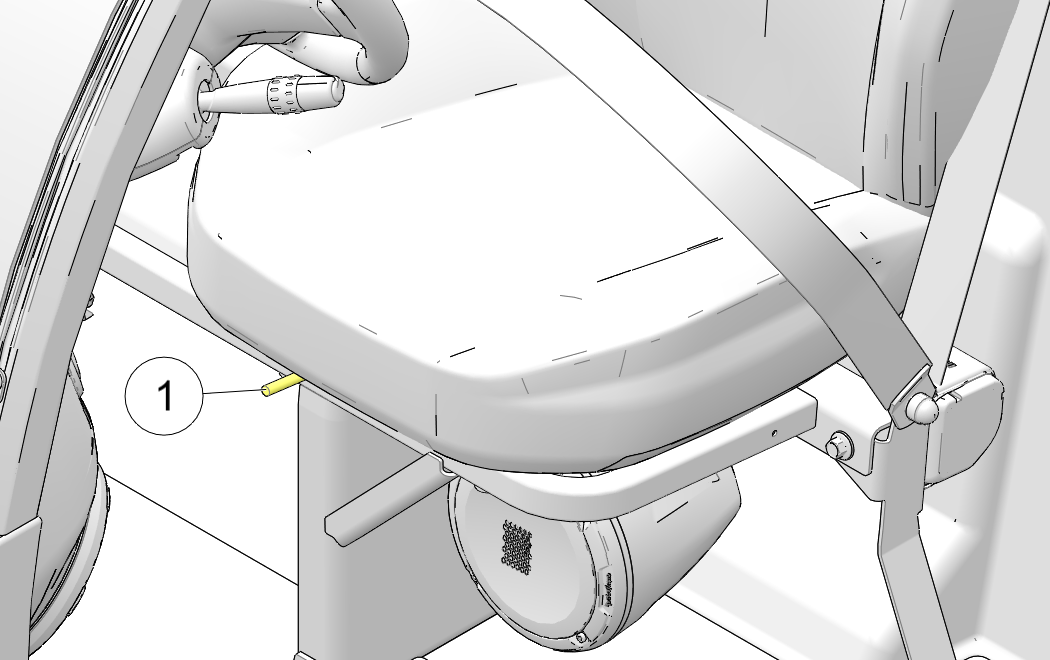
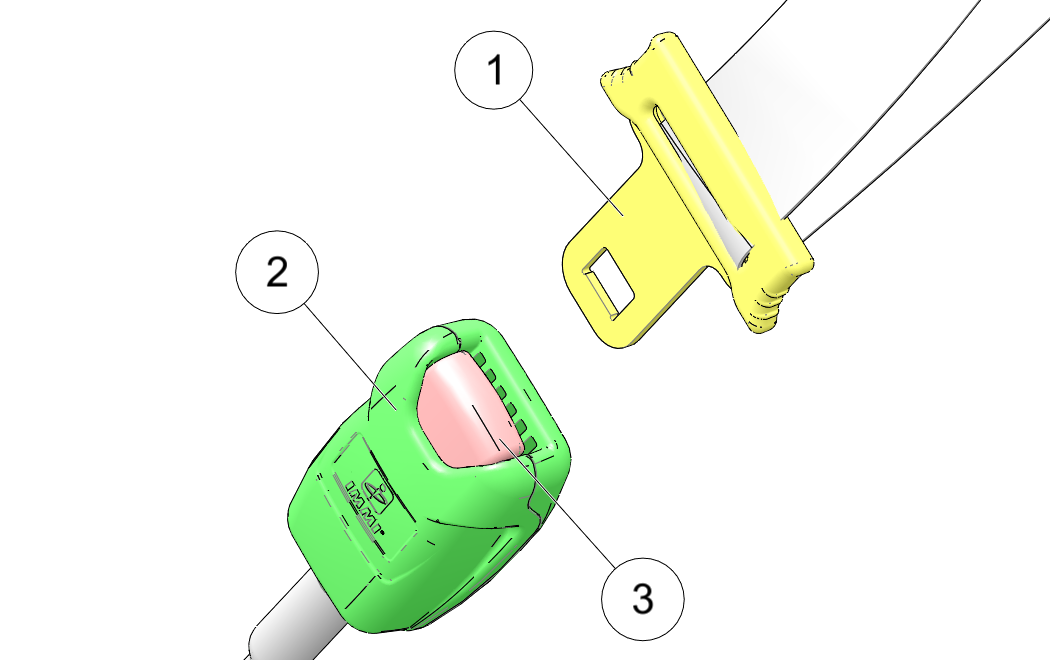
Seat belt warnings 5 are located near the shoulder anchor for each seat belt.
TO AVOID PERSONAL INJURY OR DEATH: Always fasten your seat belt.
The cargo limit cargo warning label 6 is located at the rear of the vehicle.
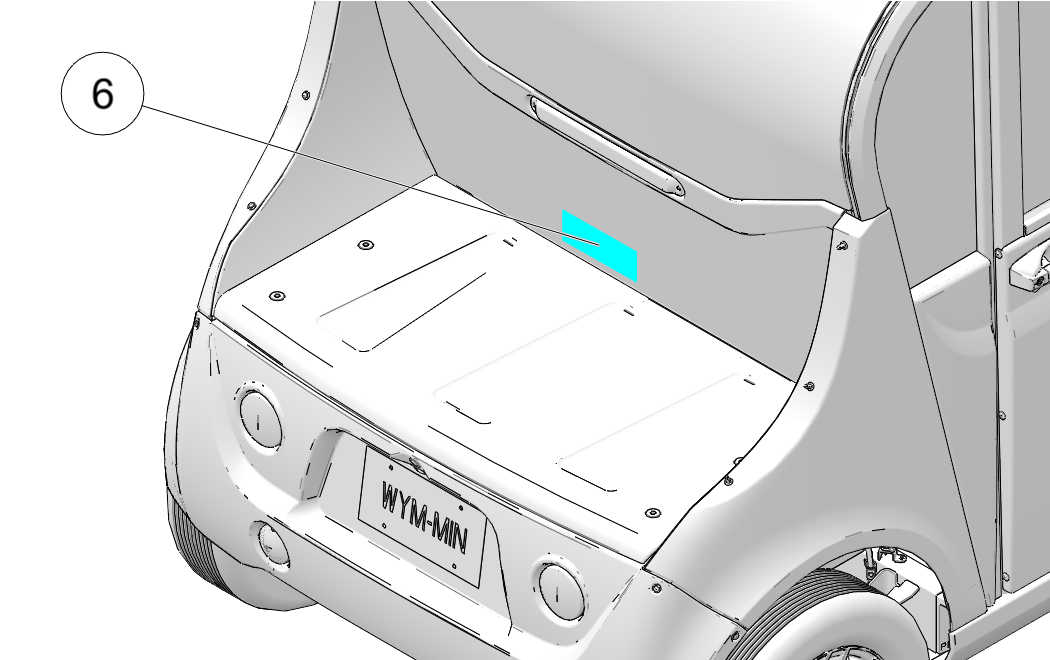
WARNING
STANDARD CARGO LIMIT 15 kg / 33 lbs.
S-BED/TRUNK-BACK CARGO LIMIT 150 kg / 330 lbs.
Distribute weight evenly. Ensure loads are properly secured. Total weight of passengers, accessories, and cargo must not exceed gross vehicle weight rating in owner's manual.
Serious injury or death can result if you do not follow these instructions and procedures, which are outlined in further detail within this owner's manual.
| GEM e2 | 2 occupants |
| GEM e4 | 4 occupants |
| GEM e6 | 6 occupants |
| GEM eL XD | 2 occupants |
Exceeding the gross vehicle weight rating of your vehicle can reduce stability and handling and could cause loss of control. NEVER exceed the GVWR of your vehicle.
The maximum payload capacity of your vehicle is the maximum weight you may add to your vehicle without exceeding the GVWR. This capacity is determined by calculating the difference between your vehicle’s GVWR and wet weight.
Refer to the specification section of this manual or the Manufacturer’s Label on the vehicle for model-specific information.
Never install any accessory that grounds to the vehicle chassis. The chassis is a floating ground to protect against electrical short circuits and hazards.
Do not install any non-GEM-approved accessory or modify the vehicle including for the purpose of increasing speed or power.
The warranty on your GEM vehicle may be voided if any non-GEM-approved equipment and/or modifications have been added to the vehicle.
Any modifications or installation of non-GEM-approved accessories could create a substantial safety hazard and increase the risk of bodily injury.
The addition of certain accessories, including (but not limited to) accessory boxes or large racks, may change the handling characteristics of the vehicle. Use only GEM-approved accessories, and familiarize yourself with their function and effect on the vehicle.
Riding in this vehicle without wearing the seat belt increases the risk of serious injury in the event of an accident or sudden stop. Occupants must wear seat belts at all times. Always make sure the seat belts are secured for operator and all passengers before operating.
Always wear your seal belt. Ensure the seat belts are secured for operator and all passengers before operating. Failure to do so could result in the risk of serious injury or death.
Operating this vehicle without proper instruction increases the risk of an accident. The operator must understand how to operate the vehicle properly in different situations and on different types of terrain. All operators must read and understand the Owner's Manual and all warning and instruction labels before operating the vehicle.

Maintenance and storage areas for Low Speed Vehicles (LSVs) must be properly ventilated, in accordance with applicable fire codes and ordinances, to prevent the accumulation of volatile hydrogen gas. Hydrogen gas is emitted during the LSV battery charging process. If not properly ventilated, hydrogen gas has a tendency to accumulate in pockets near the ceiling which can lead to fires and explosions. The amount of hydrogen gas emitted during charging depends on a number of factors including the condition of the batteries, the output rate of the battery charger, and the amount of time the batteries are charged.
Always ensure a minimum of 1 to 5 air changes per hour in the charging area (depending on factors such as the number of vehicles charging).
NOTICEThe minimum number of air changes required per hour during LSV charging depends on a number of factors including the number of vehicles charging, the size of the storage space, and the amount of hydrogen gas emitted.
At least 1 air change per hour is recommended for 1 vehicle, but up to 5 air changes per hour can be required for multiple vehicles.
NOTICEThe process, SAE J1718, can be used to determine the amount of hydrogen gas an electric vehicle will generate while being charged in a residential garage.
Consult applicable fire and safety codes for more specific ventilation requirements and to ensure the proper use of explosion proof electrical equipment.
Failure to inspect and verify that the vehicle is in safe operating condition before operating increases the risk of an accident. Always inspect the vehicle before each use to make sure it's in safe operating condition. Always follow all inspection and maintenance procedures and schedules described in the owner's manual. See the Periodic Maintenance Section of the Maintenance Chapter.
Operating the vehicle after consuming alcohol or drugs could adversely affect operator judgment, reaction time, balance and perception.
Never drink alcohol or use drugs or medications before or while operating this vehicle.
Operating a damaged vehicle can result in an accident. After any rollover or accident, have an authorized GEM dealer or qualified service dealer inspect the entire machine for possible damage, including (but not limited to) brakes, accelerator, steering system and electrical system.
Operating this vehicle at excessive speeds increases the operator's risk of losing control. Always operate at a speed that's appropriate for your skills and the traffic, visibility and operating conditions.
Exhibition driving increases the risk of an accident or rollover. Never attempt wheelies, jumps, doughnuts or other stunts. Avoid exhibition driving.
Turning improperly could cause loss of traction, loss of control, accident or rollover. Always follow proper procedures for turning. Never turn abruptly or at sharp angles. Never turn at high speeds. Practice turning at slow speeds before attempting to turn at faster speeds.
Vehicle rollover could cause serious injury or death. The cab frame is not designed or intended to provide rollover protection. Always make sure the seat belts are secured for operator and all passengers before operating. Avoid situations that could result in a rollover. Avoid sharp turns and abrupt steering maneuvers
Carrying loads on the roof could damage the roof and affect vehicle handling, which could result in an accident or rollover. Never carry loads on the roof of the vehicle.
Never exceed the stated load capacity for this vehicle. Cargo should be properly distributed and securely attached.
Reduce speed and follow the instructions on cargo warning labels for hauling cargo. Allow a greater distance for braking.
Operating this vehicle with improper tires or with improper or uneven tire pressure could cause loss of control or accident. Always use the size and type of tires specified for your vehicle.
Always maintain proper tire pressure as described in the owner's manual and on safety labels.
Leaving the keys in the vehicle can lead to unauthorized use of the vehicle by someone without a driver’s license or without proper training. This could result in an accident or rollover. Always remove the key when the vehicle is not in use.
The motor, controller, and components are very hot during and after use of the vehicle. Hot components can cause burns and fire. Do not touch hot drive system components. Always keep combustible materials away from the drive system. Use caution when traveling near or through grass, brush or muddy conditions, especially dry grass or brush, and always inspect areas near the drive system afterwards. Promptly remove any grass or debris clinging to the vehicle.
The voltage in the battery pack is sufficient to cause death by electrocution. With the exception of battery inspections, never attempt to perform service on the electric drive system, including the battery pack, unless you are properly trained to work on electrical systems.
Your authorized GEM dealer can provide battery- related service.
Do not work in or near the battery compartment or on any other electrical component of the vehicle while charging the batteries.
Before servicing the vehicle’s electrical system, always disconnect the service disconnect first, then disconnect any electrical accessory connections, then disconnect the negative cable from the 12-volt battery, then disconnect the negative terminal from the main battery pack. For more information about disconnecting the service disconnect, see the Service Disconnect section for details.
Always follow all safety instructions in the maintenance portion of this owner’s manual, as well as the following:
FOR MORE INFORMATION ABOUT SAFETY PLEASE CONTACT GEM CUSTOMER SERVICE.
GEM CUSTOMER SERVICE
Phone: 855–RIDEGEM (855–743–3436)
Web: www.gemcar.com
The left control lever contains the turn signal switch, the horn switch, the headlight on/off switch and the high/low headlight beam switch.
Check turn signal lamps before each ride. When driving, activate a turn signal before turning to alert others of your intentions.
Move the lever upward 1 to signal a right turn. Move the lever downward 2 to signal a left turn. The corresponding turn signal lamps on the front and rear of the vehicle will flash. The corresponding turn indicator in the LCD display will also flash.
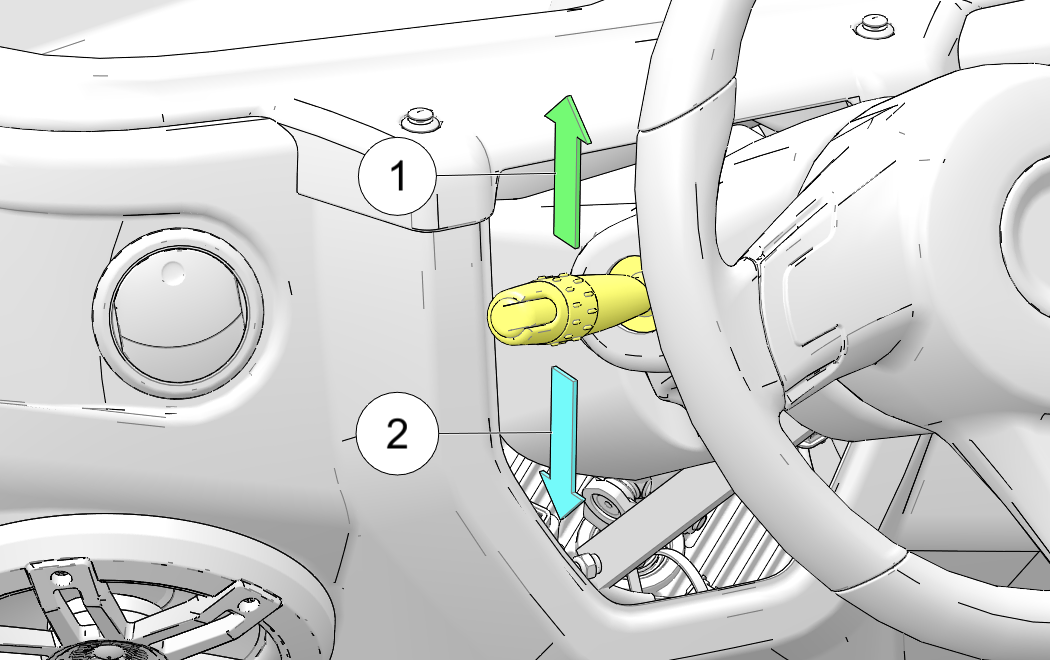
Press the tip of the left control lever 1 inward to sound the horn.

Pull the control lever toward the driver’s seat to toggle the headlights between high beam and low beam.
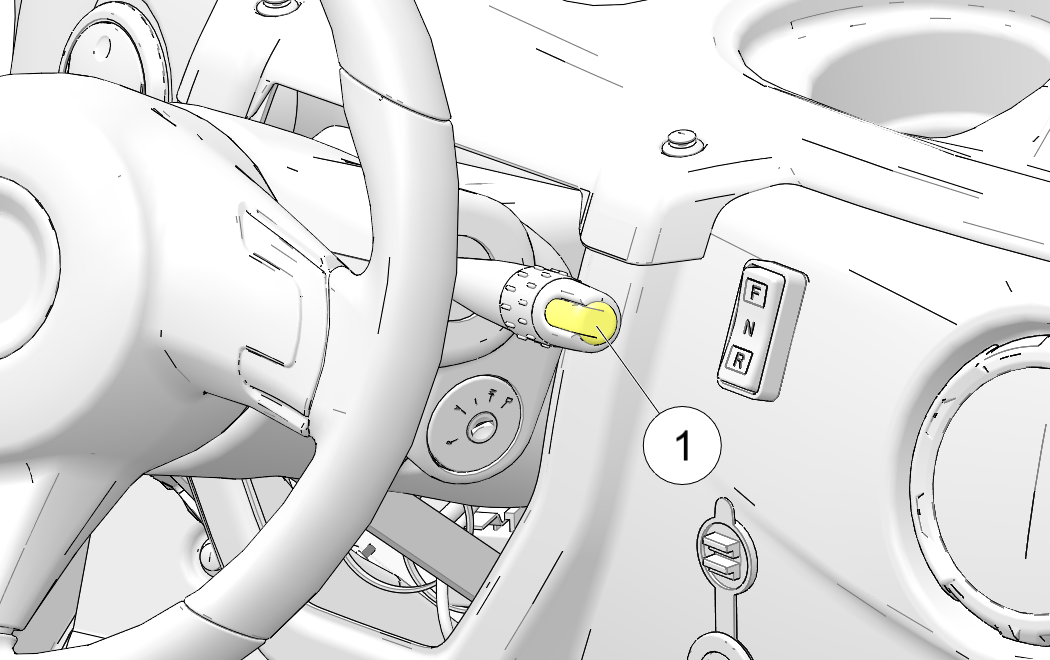
The right control lever contains the hazard signal switch, and the windshield wiper and washer switches (if equipped).
Press the tip of the lever inward 1 to cause all turn signal lamps to flash simultaneously. Use this feature to alert others of an emergency or other situation requiring caution, especially if your vehicle becomes disabled on or near a road. Press the switch again to cancel the hazard signals.
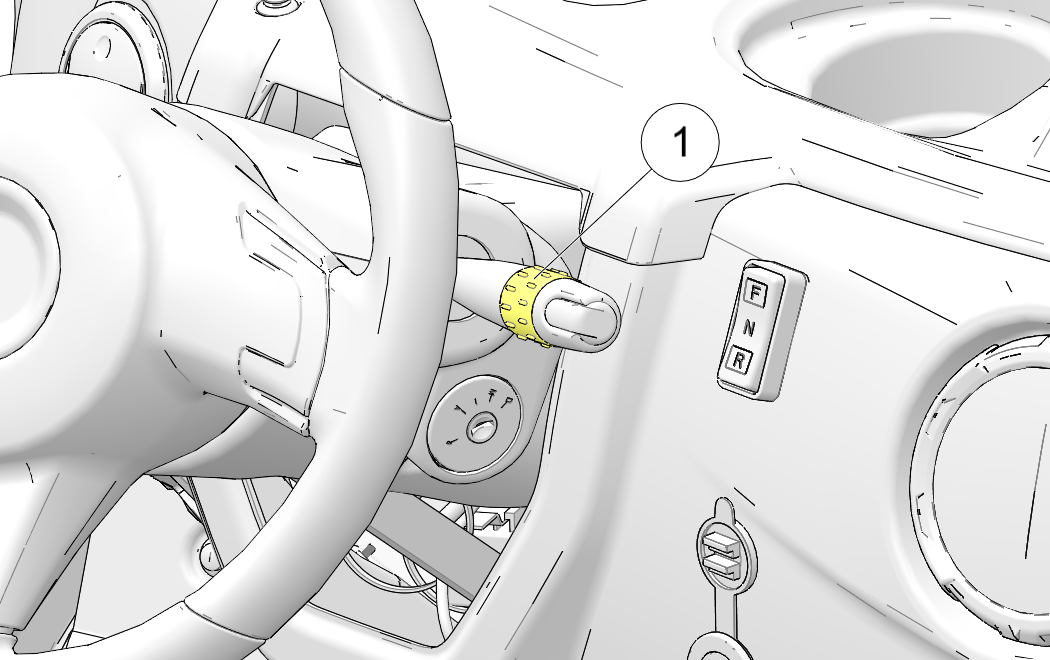
Rotate the knurled barrel 1 forward to turn the windshield wipers on. Pull the control lever toward the driver’s seat to activate the washer (if equipped).
If the wiper fails to work, check for a blown fuse at the fuse block. See Fuses and Relays.
A worn or damaged wiper blade could impair operator vision and result in an accident. A worn wiper blade could also damage windshield glass. Always replace worn or damaged wiper blades promptly.

Leaving the key in the ON position will discharge the batteries. Always turn the key to the OFF position when not operating. Remove the key from the ignition to prevent unauthorized use.
If the key is left in the ON position and there are no user inputs from: the brake pedal, parking brake, seat belt, hazard or turn signal switches, the gear selector, and the headlight switch; the vehicle will enter sleep mode after some time to prevent the batteries from fully discharging. To exit the sleep mode, cycle the key switch to OFF and back to the ON position.
NOTICE The steering column automatically locks when the ignition key is removed.The key only can be removed from the switch when it is in the OFF position.
Never turn the key to the OFF position while the vehicle is in motion. This could lead to loss of speed control and loss of vehicle control, which could result in serious injury or death.
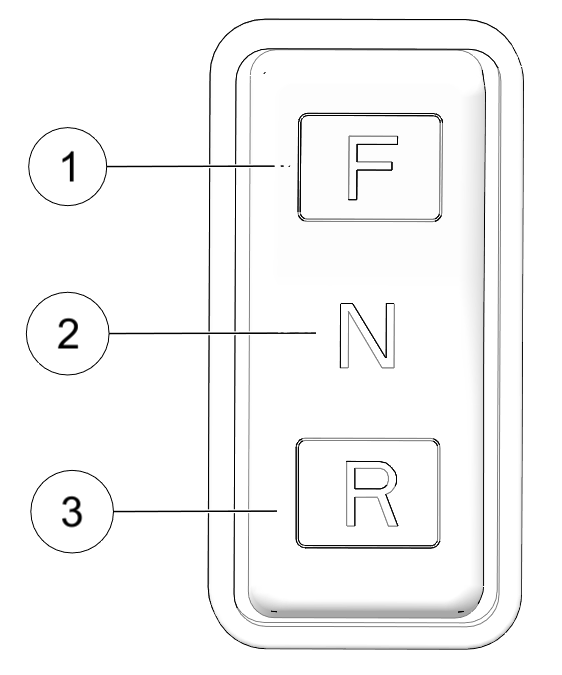
The malfunction light will illuminate after reversing direction if you press the accelerator pedal before coming to a complete stop.
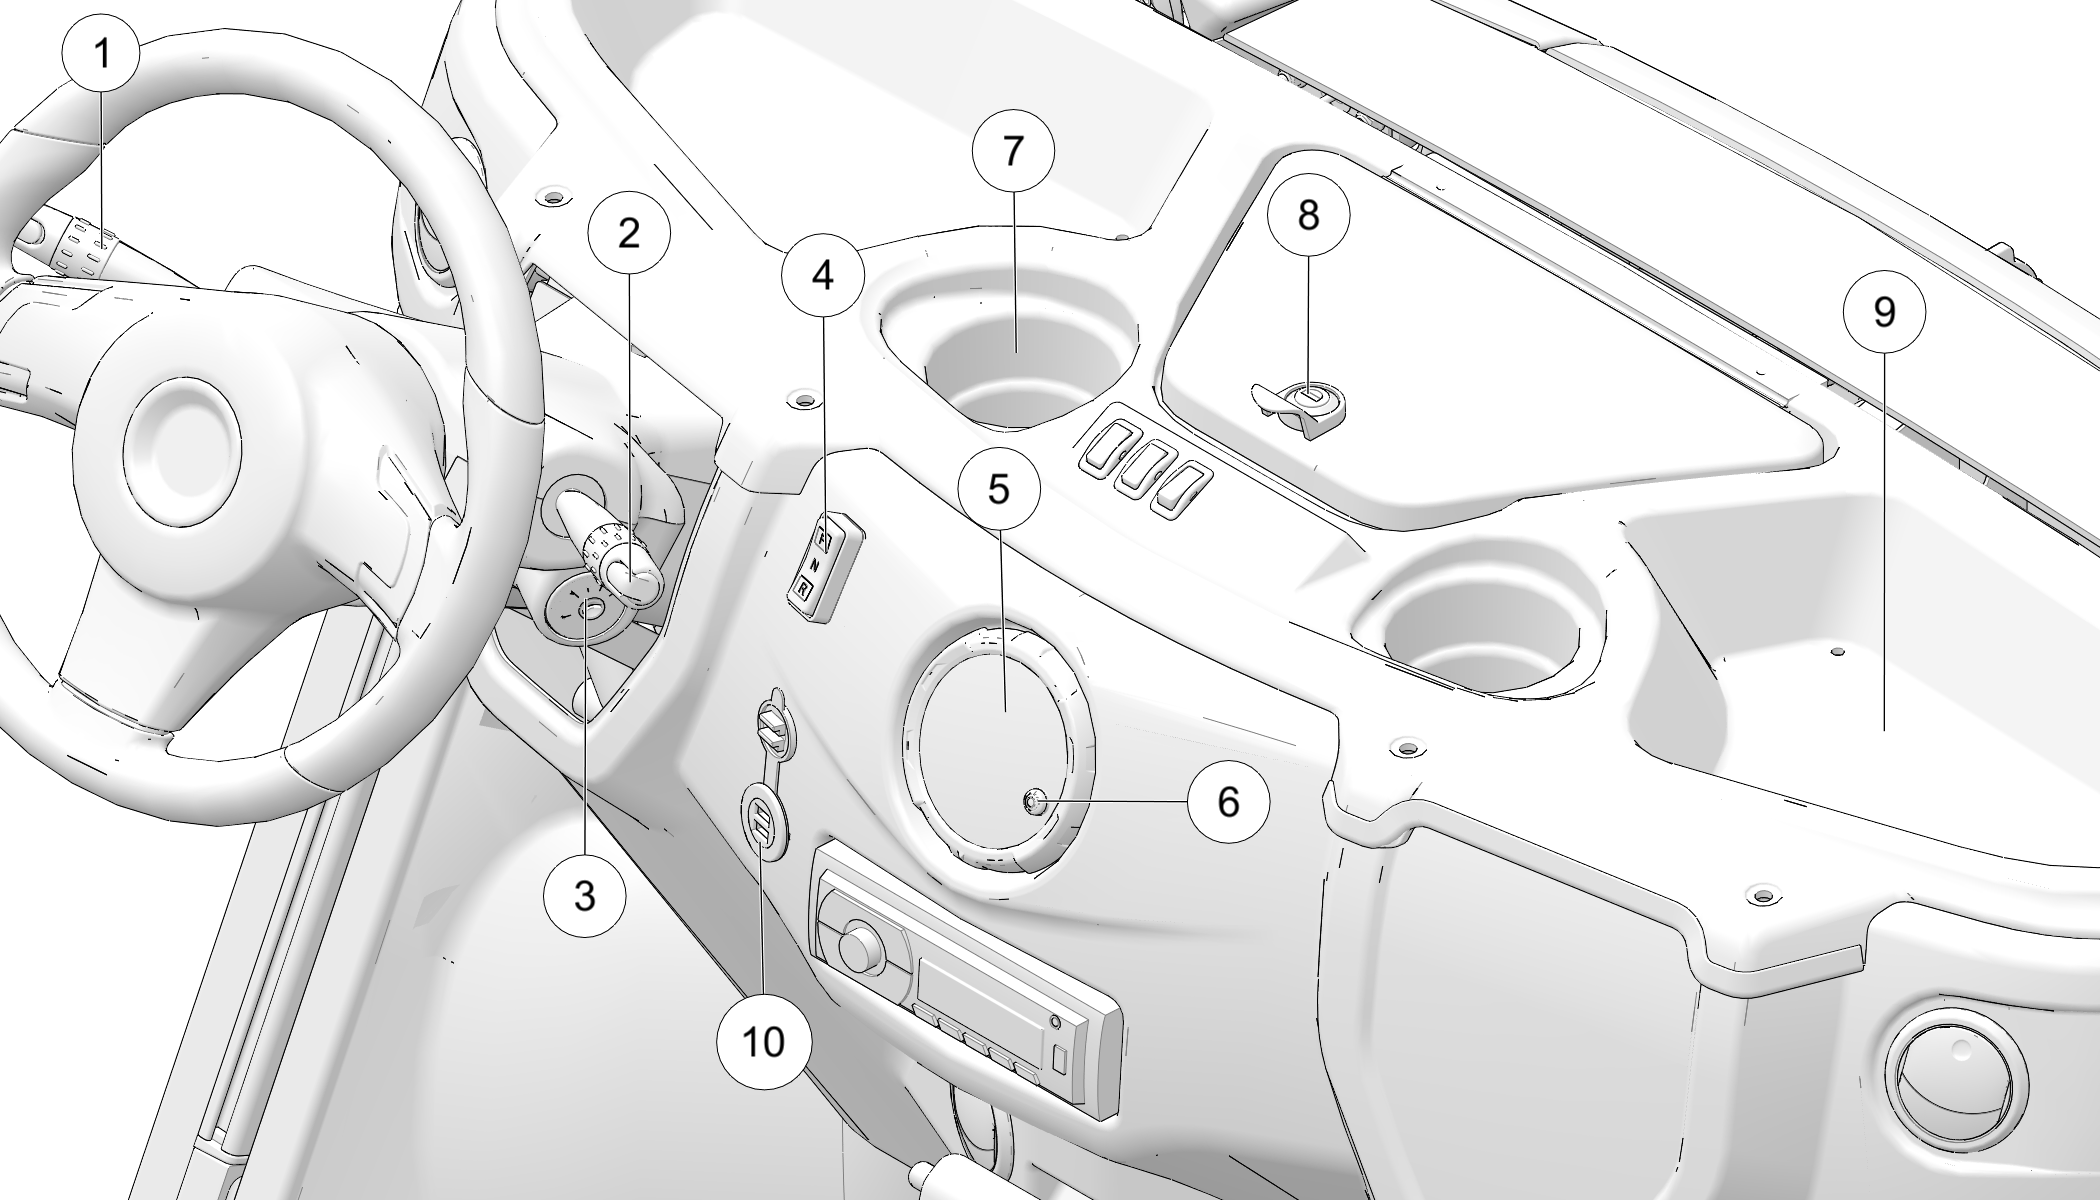
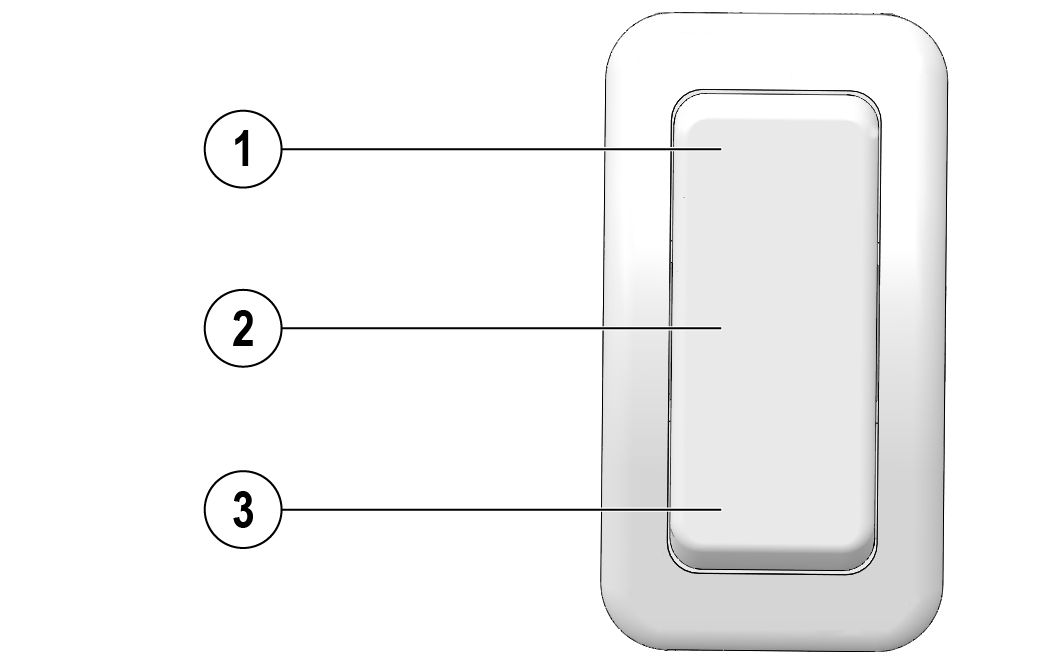
Always come to a complete stop before reversing direction. To choose the forward option, push the top of the switch 1 . Push the bottom of the switch to choose reverse operation 3 . When the drive mode switch is in the center position 2 , the vehicle is in neutral. The vehicle will not move if the accelerator is depressed.
High-pressure water may damage components. Wash the vehicle by hand or with a garden hose using mild soap. Certain products, including insect repellents and chemicals, will damage the speedometer lens and other plastic surfaces. Do not use alcohol to clean the instrument cluster. Do not allow insect sprays to contact the lens.
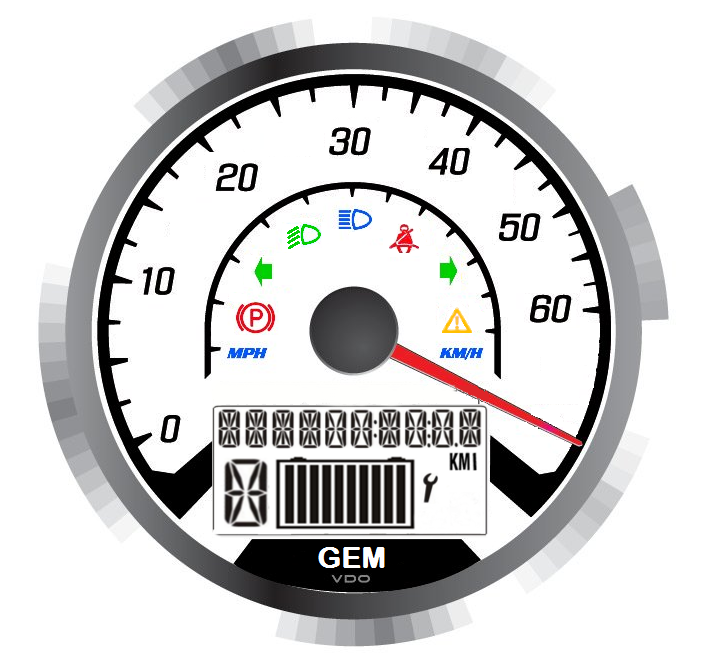
When driving, the speedometer displays vehicle speed in either miles per hour (MPH) or kilometers per hour (km/h). See Information Display Mode.
Use the MODE button to toggle through mode options. See Information Display Mode.
When standard mode is selected, speed displays in miles per hour.
When metric mode is selected, speed displays in kilometers per hour.
The brake indicator illuminates when the park brake is engaged.
A direction indicator flashes when a turn signal is active.
This lamp illuminates when the headlamp switch is set to low beam.
This lamp illuminates when the headlamp switch is set to high beam.
This lamp illuminates with the fault indicator on the rider information center to indicate a vehicle fault. See Service Indicator.
When the key is turned on, the seat belt indicator lamp will illuminate if the driver’s seat belt is not fastened. The lamp is a reminder to the operator to ensure all riders are wearing seat belts before operating.
The rider information center is located in the instrument cluster. All segments will light up for one second at start-up. If the instrument cluster fails to illuminate, a battery over-voltage may have occurred and the instrument cluster may have shut off to protect the electronic speedometer. If this occurs, your dealer can provide proper diagnosis.
The information center is set to display standard units of measurement and a 12-hour clock at the factory.
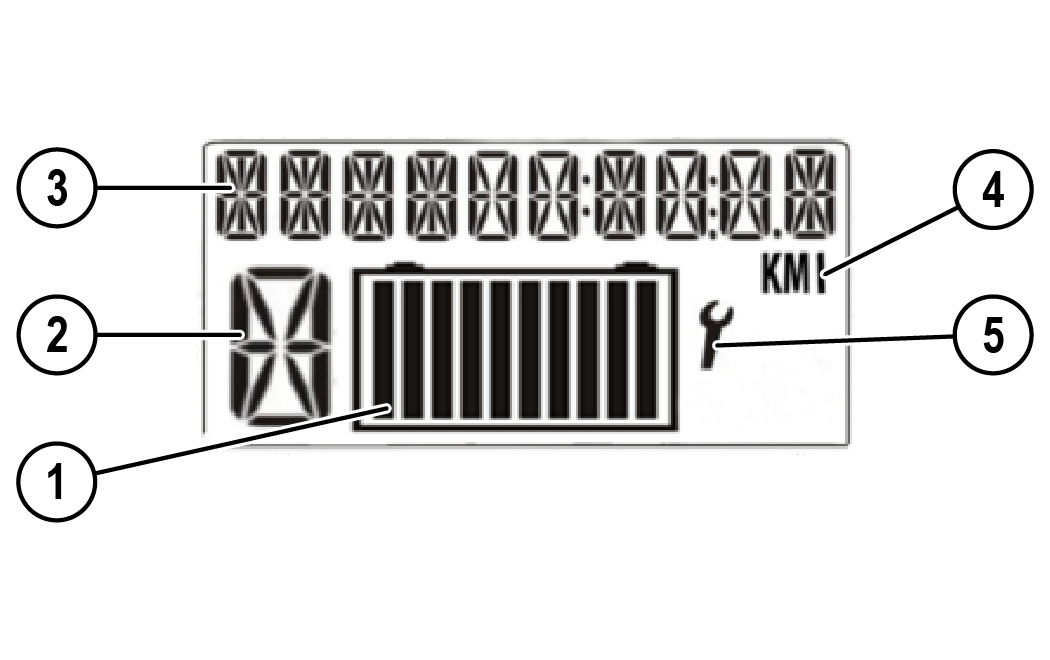
This area will display clock, odometer, trip meter, state of charge (SOC), range meter, efficiency rate (EFF) or any existing fault codes or warning messages. See Information Display Mode.
The miles or kilometers indicator illuminates to indicate the mode of measurement selected.
When both the chassis fault lamp and the service indicator (wrench symbol) illuminate, use the mode button to toggle to VEH FAULT on the display, press and hold the mode button for 3 seconds to access the currently active trouble codes. Pressing the mode button momentarily will toggle through all current trouble codes. Your authorized GEM dealer can provide code details and diagnosis.
This indicator displays the drive mode.
R = Reverse (flashing)
This indicator illuminates when the key is turned on. It also illuminates 8-10 seconds after the charging cord is connected, turning off when the batteries are 100% charged. To verify a full charge or to check the state of charge, turn the key on. As charge is depleted, illuminated bars begin to turn off from right to left. Remaining bars indicate remaining battery charge.
State of Charge Indicator
Cold weather affects your electric vehicle’s performance. The colder the ambient storage temperature, the slower the rate of charge and discharge of batteries. In the application of an electric vehicle like GEM, cold weather could decrease the achieved range on a charge.
This area will display clock, odometer, trip meter, state of charge (SOC), range meter, efficiency rate (EFF) or any existing fault codes or warning messages.
The display can be changed to show either standard or metric units of measurement for each of the following settings.
Standard Display
Metric Display
Temperature
To exit the set-up mode, turn the key off. Wait 5 seconds, then turn the key on. The gauge displays the mode that was displayed prior to setting the units.
The odometer displays the distance traveled by the vehicle since manufacture.
The trip meter displays distance traveled since the last reset of the trip meter. To reset, toggle to the trip meter display. Press and hold the MODE button until the meter resets to zero.
This mode displays the remaining system voltage level in percentage format.
The range meter displays the approximate distance the vehicle could travel on the remaining battery voltage level.
This mode displays the rate at which electrical power (Wh) is consumed per mile or per kilometer. A higher number indicates less desirable efficiency. A lower number indicates better efficiency.
This mode displays the amount of Kilowatts that the vehicle has charged on in its life. This feature is available for vehicles equipped with a standard charger, but may not be available for vehicles equipped with the Fast Charger option.
If equipped, the steering wheel can be tilted upward or downward for rider preference.
Pull and hold the adjustment lever 1 upward while moving the steering wheel upward or downward. Release the lever when the steering wheel is at the desired position.
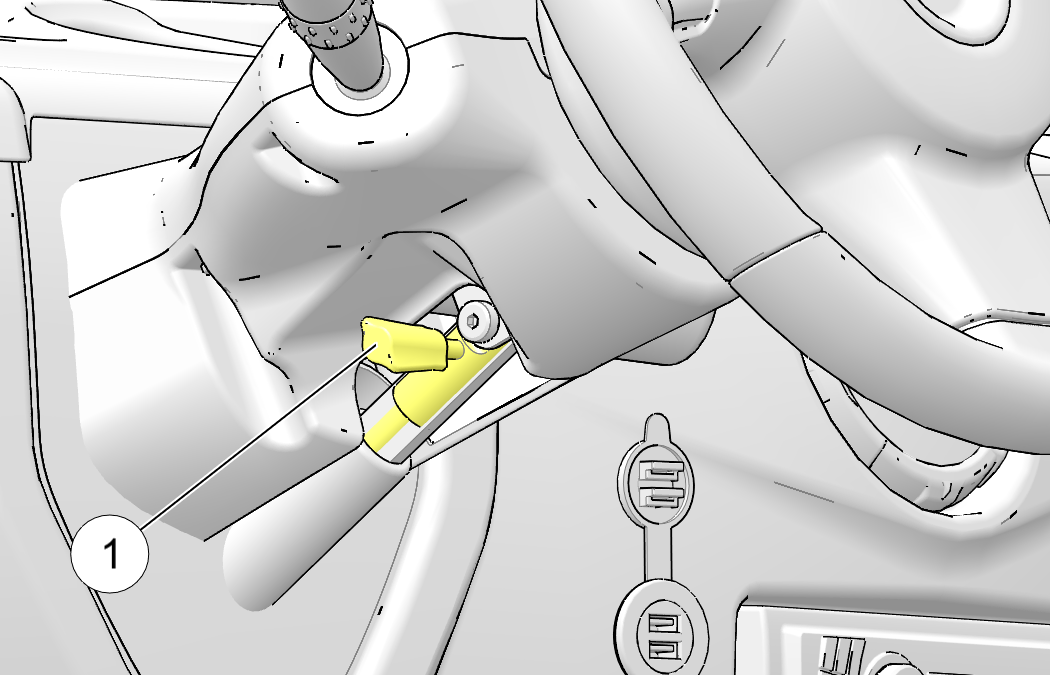
The glove box is equipped with a lock to protect items from theft or damage. Use the accessory lock key to lock and unlock the glove box door. Turn the key 1/4 turn counter- clockwise to unlock the door.
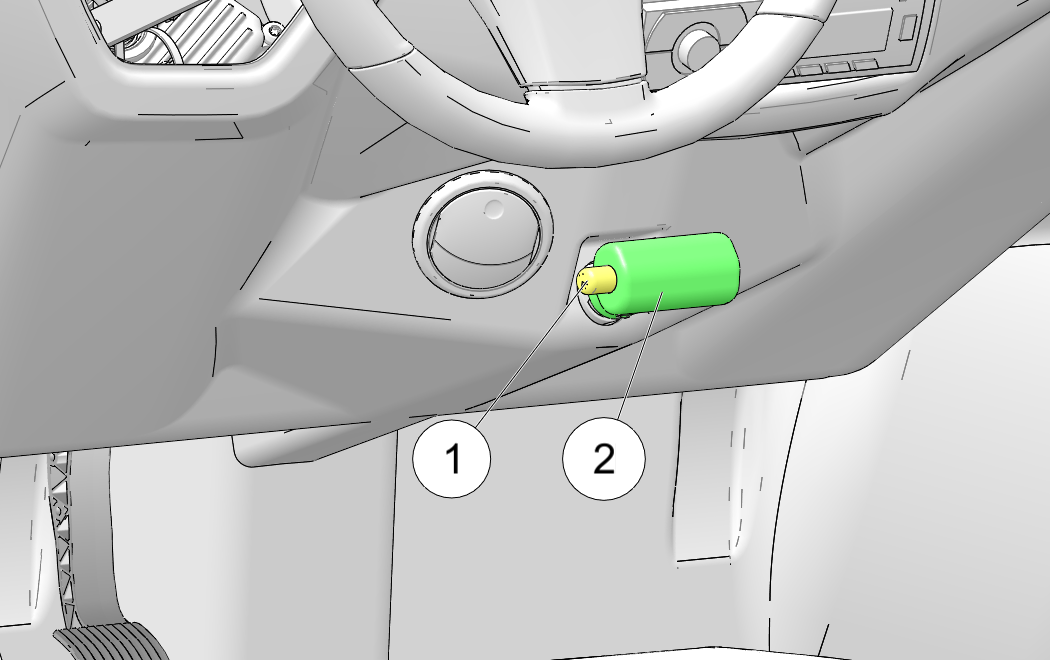
The fuse for the USB port 1 is located under the hood in the fuse block. Always use fuses with the same type and rating.
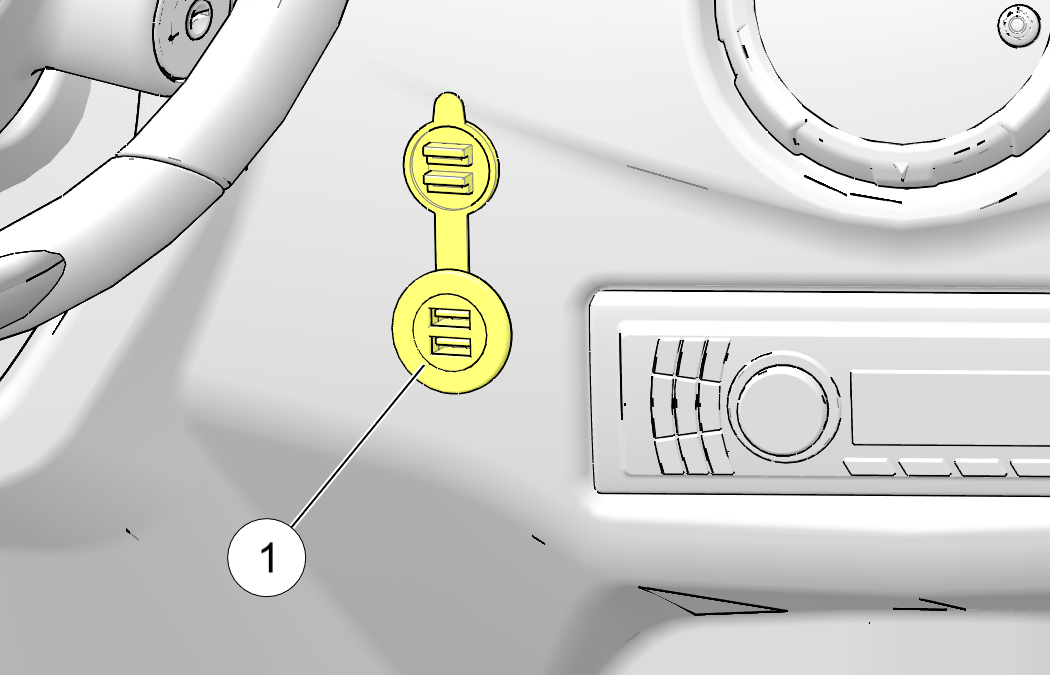
Do not plug in devices requiring power exceeding 25 watts. Damage to the vehicle electrical system may occur or an accessory fuse may blow.
Your vehicle is equipped with a battery pack. This battery pack supplies the power needed to operate the vehicle.
These batteries perform best when recharged fully and often. Recharge the batteries daily or after each use of the vehicle.
NOTICEEach vehicle is programmed at the factory for a particular battery type. Switching battery types should be done only by an authorized service technician. Your authorized GEM dealer can provide battery-related service.
To access the battery pack, remove any rear accessory back installed on the vehicle. See Rear Accessory Backs (Option). Release the battery pack access cover fasteners and remove the cover.
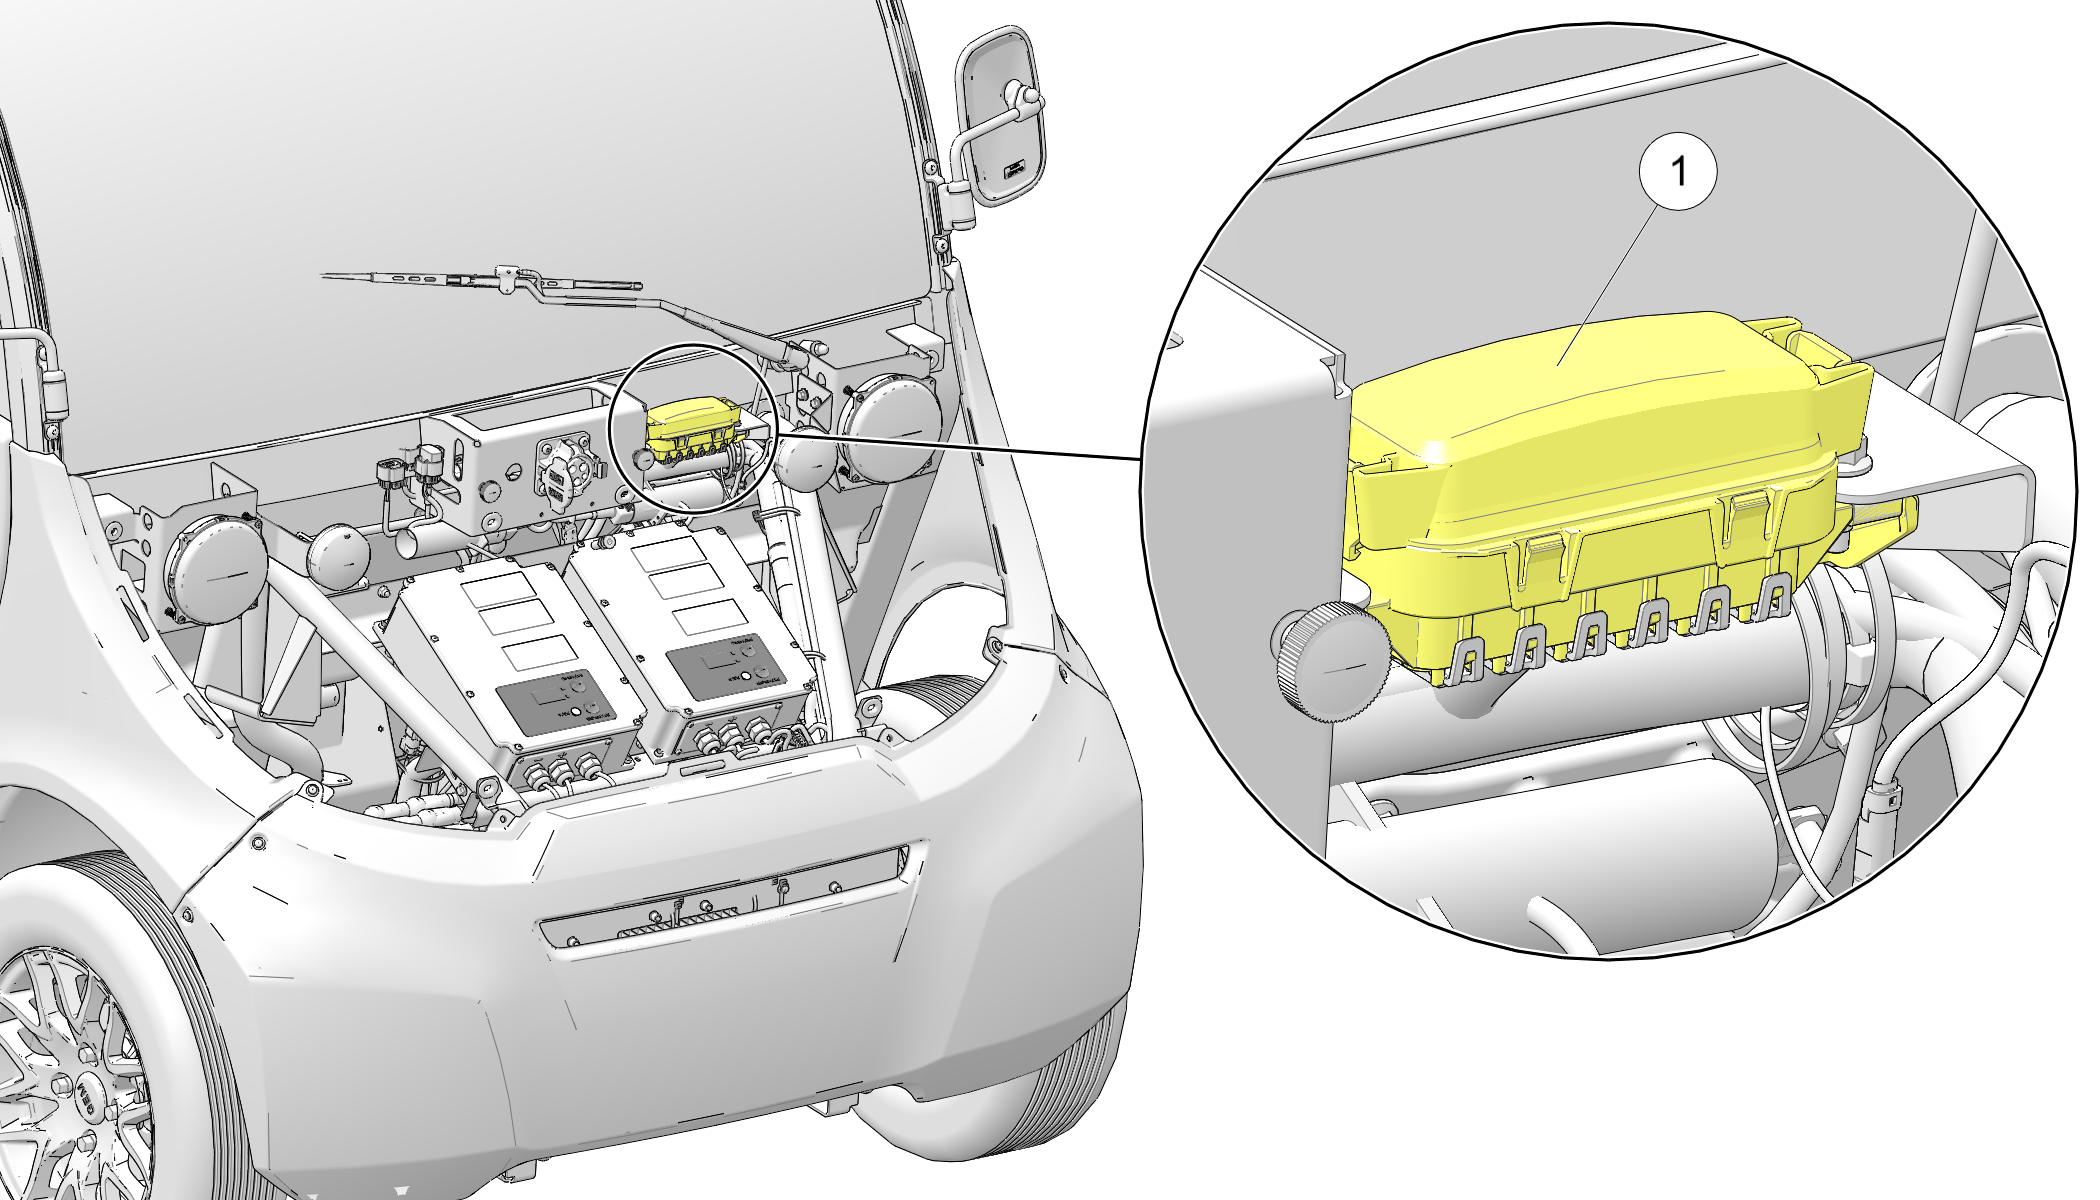
The on-board battery charger is located under the hood.
The state of charge of the batteries displays in the rider information center and a “C” displays when the vehicle is charging.
When the vehicle will not be used for 10 or more days, connect the charger. The state of charge of the batteries will be monitored, and charging will automatically be initialized when the state of charge drops below 97% or when 28 days have passed since the last charge completed.
This works best for maintenance free sealed Absorbent Glass Mat (AGM) batteries.
IMPORTANT Avoid temperature extremes when choosing a storage area.If the combined voltage of all batteries reaches 36 volts or less, a safety feature in the on- board charger will not allow the charger to activate. If this occurs, use the alternate charging method. See Batteries section in the Features and Controls chapter.
Your vehicle is equipped with either a standard charge receptacle or a fast charge receptacle. The battery charge receptacle is located at the rear of the hood, just below the windshield.
Using a non-recommended extension cord could result in fire, heat damage or charger failure, which could result in serious injury or death. Always use the recommended type of cord to charge the batteries.
Charging from a circuit of lesser capacity and/or using a cord from the outlet to the vehicle that is not sufficient in wire gauge could create a fire hazard.
Failure to provide adequate ventilation while charging batteries can result in an explosion. Hydrogen gas is emitted during charging and will rise and accumulate at the ceiling. Always ensure a minimum of five (5) air changes per hour in the charging area. Never charge the batteries in an area subject to a flame or spark, including areas containing gas or propane water heaters and furnaces. Do not smoke in the charging area.
NOTICE Do not use a ground fault interrupt (GFI) type cord on a GFCI-protected outlet.A GFI (Ground Fault Interrupt) receptacle is recommended. See your authorized GEM dealer if you do not have a GFI receptacle at your regular recharge site.
The following information applies to use of the standard charge receptacle. See Fast Charge Receptacle for information that applies to the use of the fast charge receptacle.
When charging the vehicle, always use the standard Polaris charge cord.
The following information applies to use of the fast charge receptacle. See Batteries section in the Features and Controls Section for information that applies to the use of the standard charge receptacle.
NOTICEEnhanced standard charge cord will not insert into the fast charge receptacle and damage may occur if forced.
The following only applies to AGM Batteries. Do not attempt to charge Lithium Ion batteries with a charger other than the one on-board the vehicle.
If the combined voltage of all batteries reaches 36 volts or less, a safety feature in the on- board charger will not allow the charger to activate. Use the alternate charging method to add a small charge to each battery separately. The on-board charger will then activate properly to recharge all batteries to a full charge.
Use a 12-volt battery charger to charge 12-volt batteries. Charge each battery individually.
Use a 12-volt charger to charge 6-volt batteries. Charge in four groups, each consisting of two sequentially wired batteries.
It is not necessary to remove or disconnect battery post connections during the alternate charging method.
Do not work in or near the battery compartment or on any other electrical component of the vehicle while charging the batteries.
Before servicing the vehicle’s electrical system, always disconnect the service disconnect first, then disconnect any electrical accessory connections, then disconnect the negative cable from the 12-volt battery, then disconnect the negative terminal from the main battery pack. See Service Disconnect section in the Features and Control chapter for more information. This will disable the vehicle by disconnecting the battery pack from the motor. It does not disable the battery pack. HIGH VOLTAGE will be present at the battery terminals and contactor.
HIGH BATTERY VOLTAGE IS ALWAYS PRESENT. DO NOT TOUCH THE BATTERY TERMINALS.
Always wear safety glasses or approved eye protection when servicing the vehicle. Wear a full-face shield and gloves when working with or around batteries and electrical connectors.
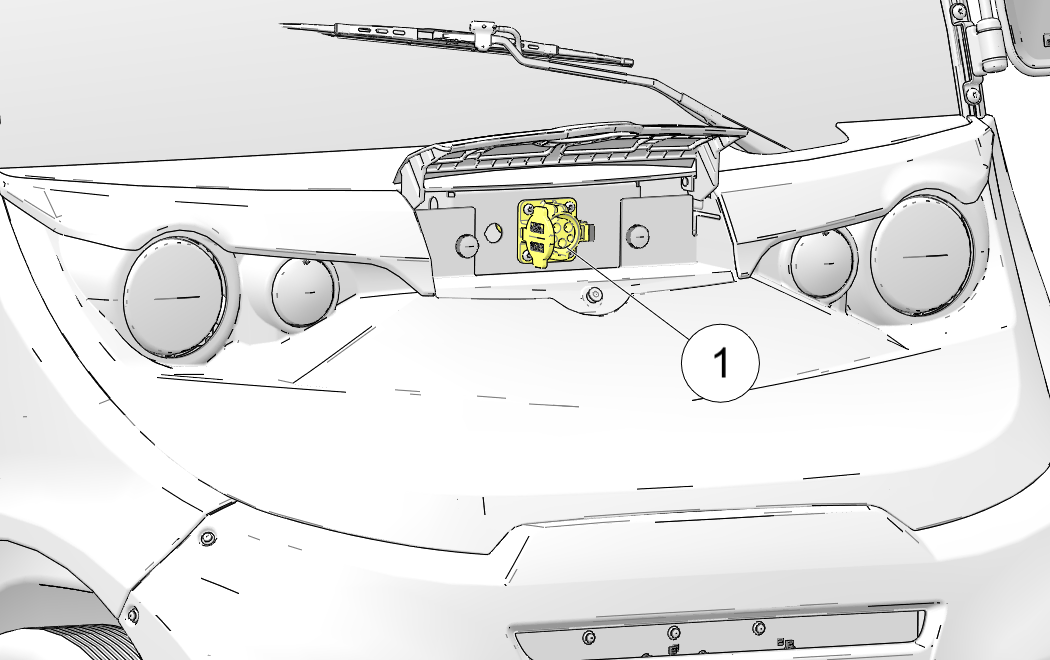
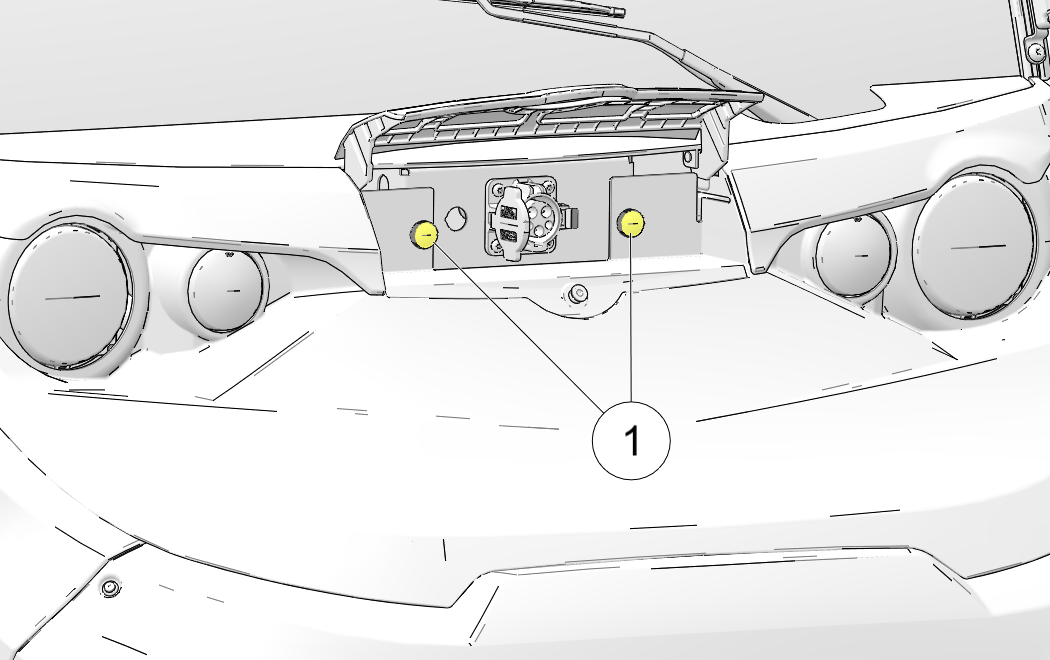
Remove the upper dash to access the 12-volt terminal board 1 . Always make sure that all 12-volt electrical accessories are grounded directly to the negative (-) post on the terminal board. Never use the chassis or body as a ground connection. Use the positive (+) terminal only for accessories that require constant power (when the ignition key is off). Use the accessory (ACC) terminal for accessories that require power only when the ignition key is on.
To avoid draining the battery system, always install an accessory exactly as stated in the provided installation instructions.
When the service disconnect is unplugged, the battery pack is disconnected from all electrical components, with the exception of the contactor. After servicing the vehicle, the service disconnect should be the last connection to be made.
Damage to electrical connections and components will occur if they are unplugged before the service disconnect is disconnected.
Before servicing the vehicle’s electrical system, always unplug the service disconnect first, then disconnect any electrical accessory connections, then disconnect the negative cable from the 12-volt battery, then disconnect the negative terminal from the main battery pack.
Insulate any tools used within the battery area to prevent sparks or battery explosion caused by shorting the battery terminals or wiring. Remove the batteries, or cover the exposed terminals with an insulating material.
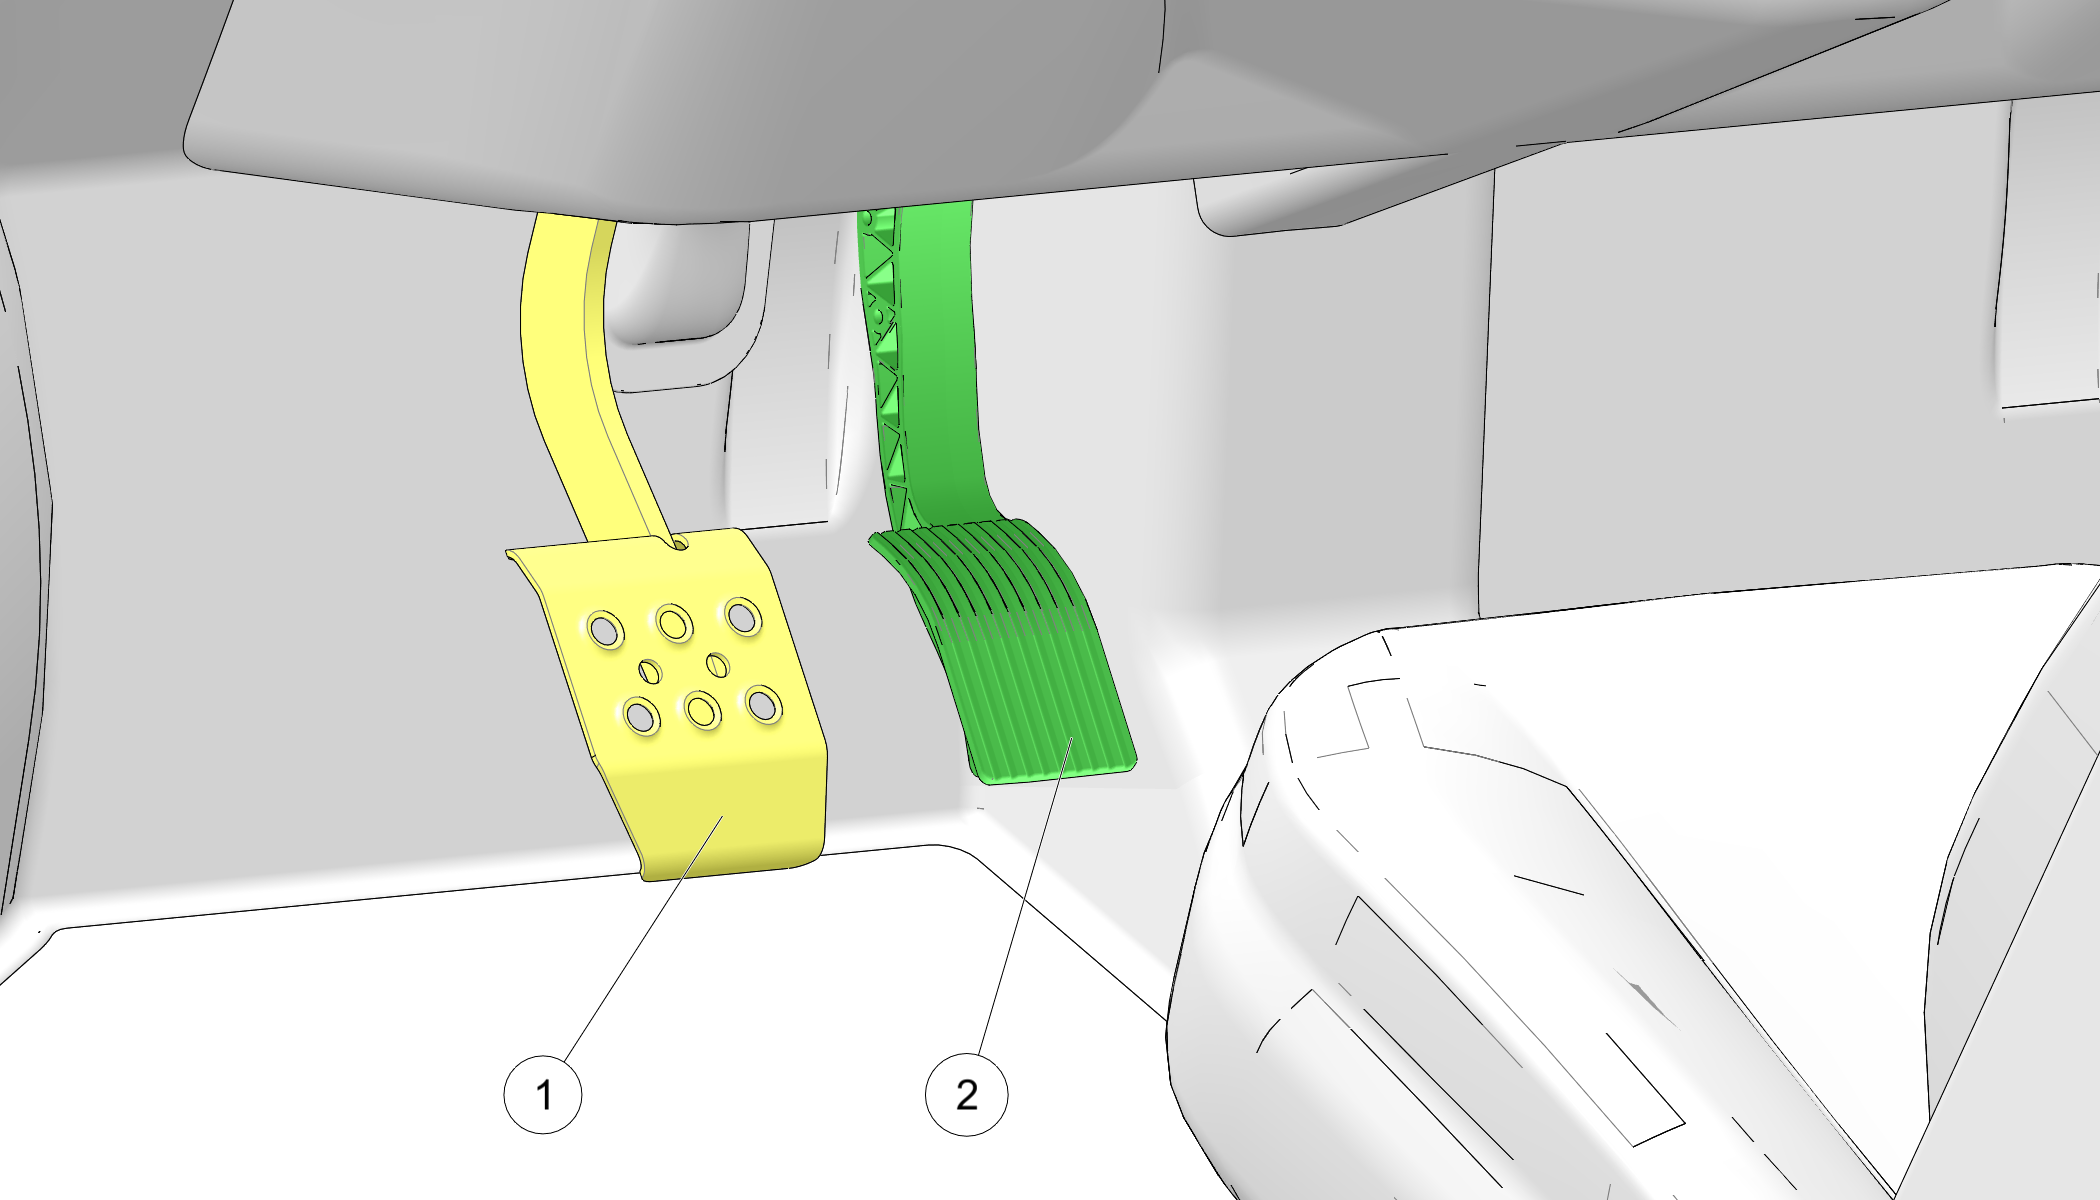
The brake pedal 1 is located on the floor to the left of the accelerator pedal 2 . Push the brake pedal toward the floor to slow or stop the vehicle. Apply the brakes before turning the key on.
Constant brake use (riding the brakes) can cause brakes to overheat and fail, which could lead to an accident resulting in serious injury or death. Do not drive with your foot resting or riding on the brake pedal.
The accelerator pedal 2 is located on the floor to the right of the brake pedal. To begin moving or to increase vehicle speed, gradually push the accelerator pedal toward the floor. Holding the accelerator pedal down continuously will accelerate the vehicle to the maximum speed.
The accelerator pedal will function only if the key is on.
To slow the vehicle, release the accelerator pedal and apply the brake. The electric motor provides additional braking force when the brake pedal is applied.
A rolling vehicle can cause serious injury. Always set the park brake when leaving the vehicle unattended.
Remove the key from the ignition to prevent unauthorized use.
Always apply the brakes before setting or releasing the park brake. To release the park brake, press and hold the park brake release 1 and move the lever to the disengaged position. To set the park brake, pull the park brake lever 2 slightly upward and toward the center of the vehicle. If the key is turned off without setting the park brake, an alert will sound. Set the park brake to end the alert.
When the park brake is set and the brake indicator is illuminated, the vehicle will not move.
NOTICEBe sure the park brake is fully disengaged before driving. Failure to do so can lead to overheating of the rear brakes.
NOTICEThe park brake is adjustable and should be checked periodically as outlined in the Periodic Maintenance Chart in the Maintenance chapter. Your authorized GEM dealer can assist.
Turn the dome lights on or off by pressing the switch 1 located on the dash between cup holders.
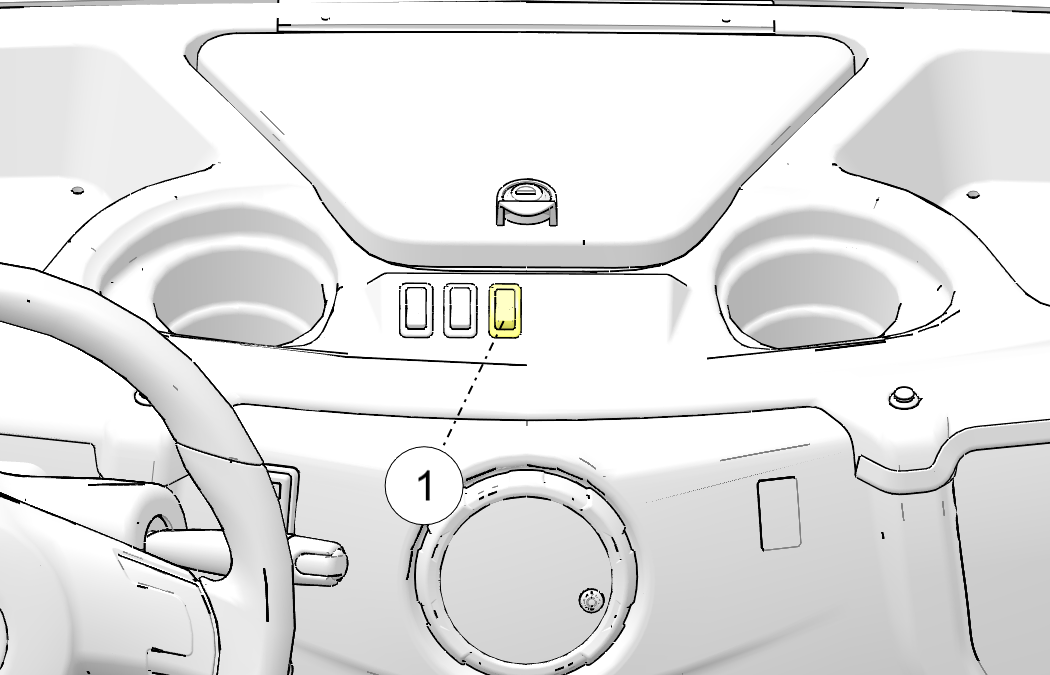
The location of under dash lighting switch in the bank of switches on the dash varies with the options installed on the vehicle.
Accessory doors are available for most models.
Doors do not offer structural protection in the event of an accident and do not change the open body characteristics of the vehicle. The doors provide protection from the weather only. Always use seat belts. Failure to use the seat belts puts the driver and passengers at greater risk of serious injury or death in the event of an accident.
Riding in this vehicle without wearing the seat belt increases the risk of serious injury in the event of an accident or sudden stop. Occupants must wear seat belts at all times. Always make sure the seat belts are secured for operator and all passengers before operating.
Always wear your seal belt. Ensure the seat belts are secured for operator and all passengers before operating. Failure to do so could result in the risk of serious injury or death.
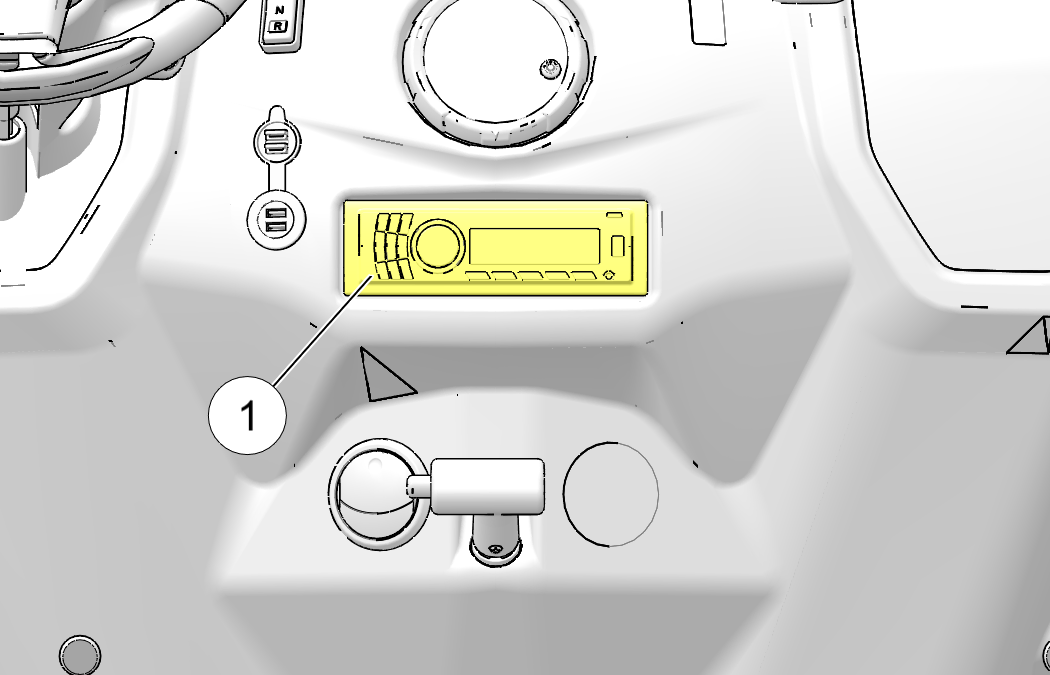
Optional stereo systems with different features are available. The stereo system 1 is mounted in the middle of the dash. Refer to your stereo system’s user manual for detailed operating instructions.
Liquids can damage electrical components. Handle liquids with care. Do not spray water directly into the upper or lower console.
Electrical wiring and components are located under and behind the upper and lower console 1 .
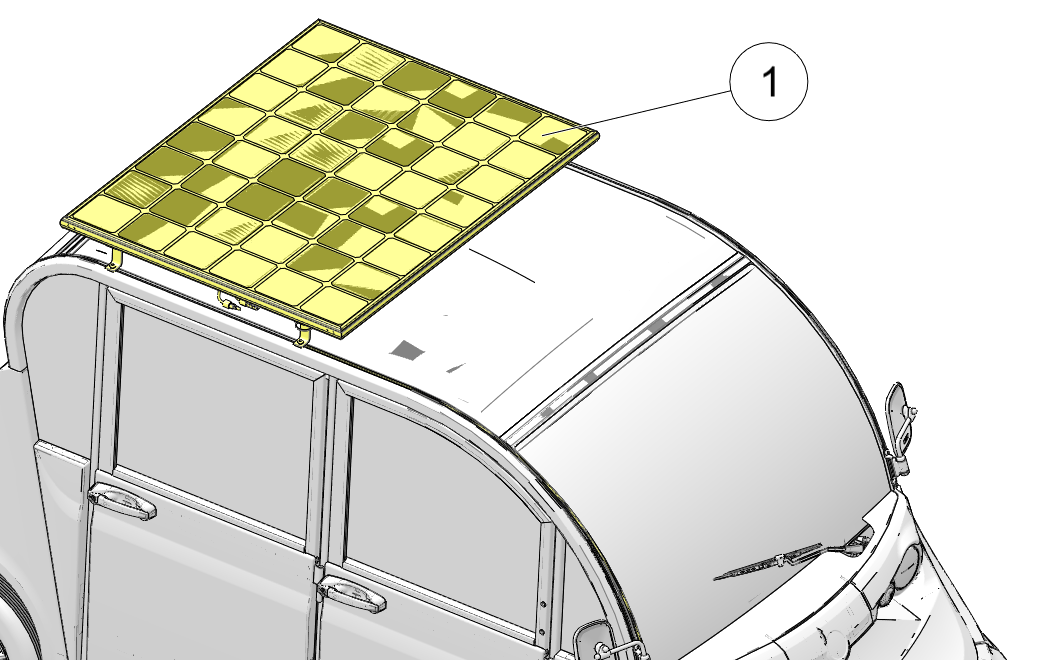
The optional solar panel 1 is mounted on top of the vehicle. Refer to your solar panel user manual for details.
Many rear accessory options are available, a couple are shown below. Accessory backs are interchangeable.
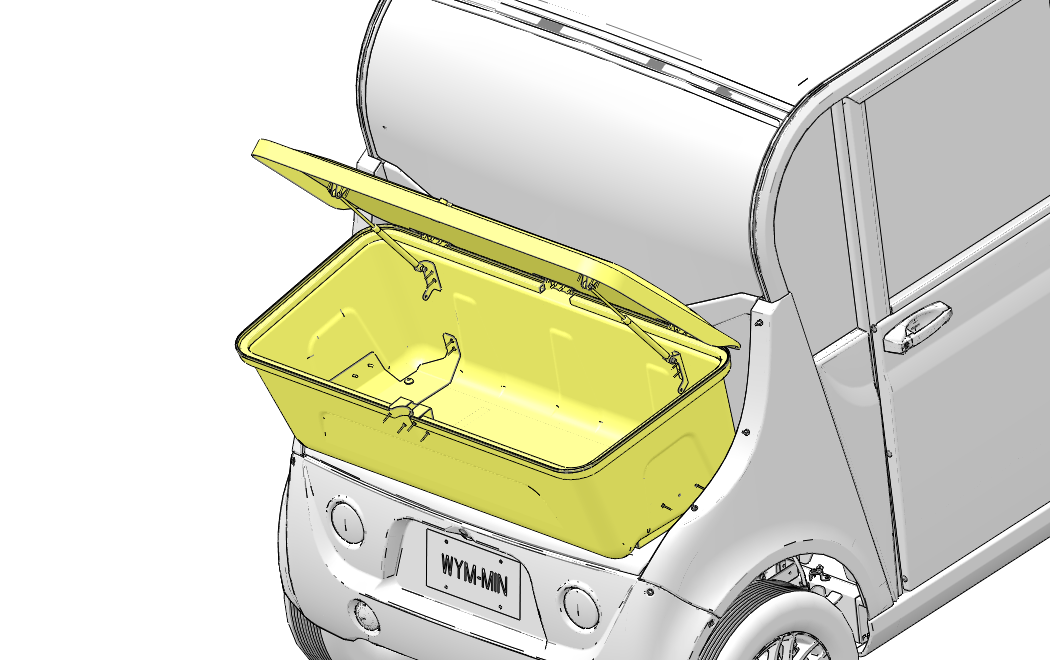
Trunkback
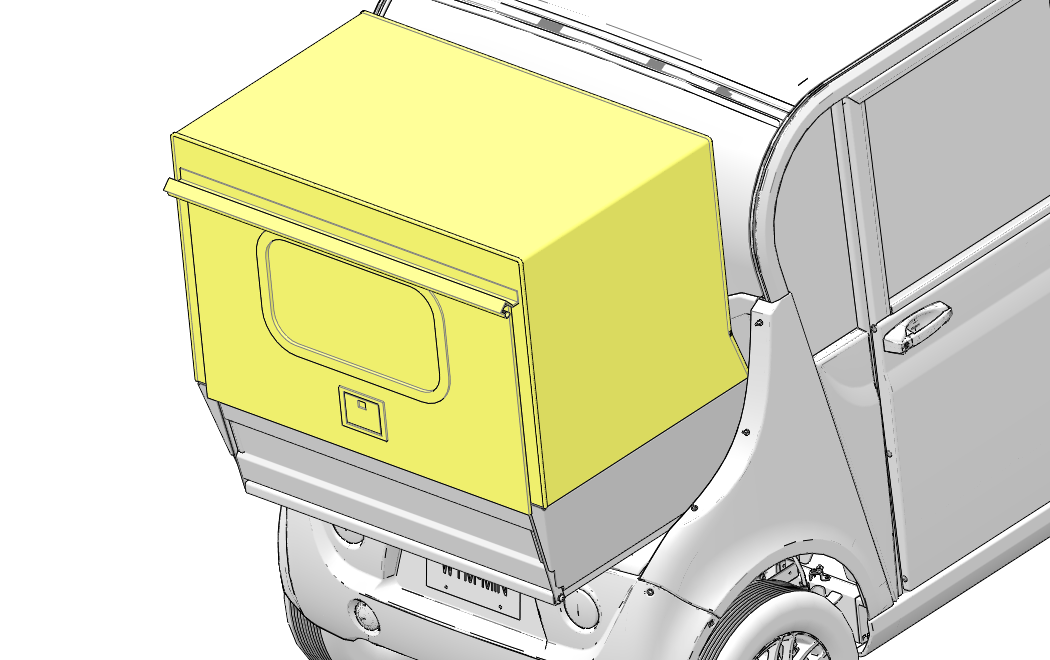
Cargo Carrier
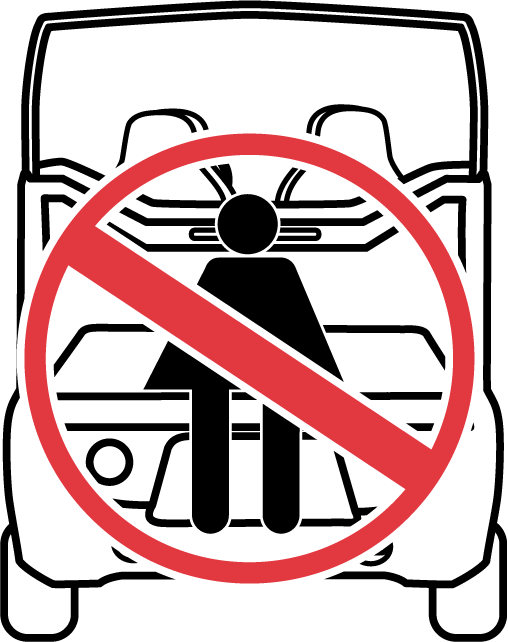
Never carry a passenger on a rear accessory back. Do not overload an accessory back. Overloading the vehicle can reduce stability and handling and could cause loss of control. Never exceed the GVWR or the GAWR of the vehicle. See Gross Vehicle Weight Rating (GVWR).
NOTICEUse only GEM-approved rear accessories. Others may cause damage to the locking system or vehicle, and may void warranty.
Grab handles can be added at each seat position to assist riders in entering and exiting the vehicle. Interior grab handles are not intended to retain passengers in the vehicle. Always make sure the seat belts are secured for operator and all passengers before operating.
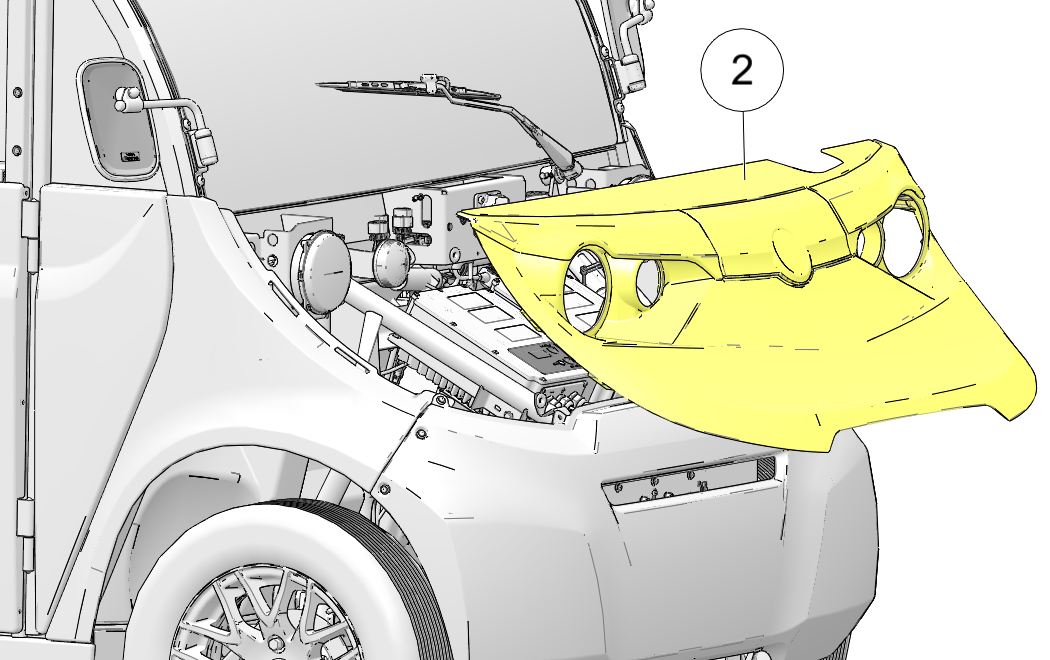
Remove the hood to access the fuse box, windshield washer fluid tank (if equipped), service disconnect and electrical accessory connectors.
A rear hitch (if installed) is for light-duty off-road use. Hitch use is not approved for on-road operation.
Never exceed the GVWR or the GAWR of the vehicle. See Gross Vehicle Weight Rating (GVWR).Front bumpers are for appearance only and will protect the body panels only from minor dents and scratches. They will not provide protection to the vehicle in front-end collisions.
NOTICE Never use your GEM vehicle for pushing. Damage to the vehicle may result.The heater unit can be used to provide heat inside the vehicle. The switch is located on the console. Move the switch to the HEAT position. Move the switch to the FAN position to operate air flow without heat.
The heated windshield has heating elements within the glass to assist in defogging the windshield.
Press the heated windshield switch on the console to turn on the heating elements. A light on the switch illuminates when the elements are heating.
Press the switch again to turn off the heating elements. If the heating elements are not turned off, they will automatically turn off after five minutes of operation.
Rotate the knurled barrel 1 forward to turn the windshield wipers on.
Pull the control lever toward the driver’s seat to activate the washer. Check the washer reservoir fluid level frequently.
When the level is low, remove the cap and add windshield antifreeze (not radiator antifreeze) rated for -25 f (-31 c) .
Commercial windshield washer solvents are flammable. Keep sparks, flames and cigarettes away. Handle with caution.
Failure to operate the vehicle properly can result in a collision, loss of control, accident or rollover, which may result in serious injury or death. Read and understand all safety warnings outlined in the safety section of this owner’s manual.
Failure to operate the vehicle properly can result in a collision, loss of control, accident or rollover, which may result in serious injury or death. Read and understand all safety warnings outlined in the safety section of this owner’s manual.
Failure to inspect and verify that the vehicle is in safe operating condition before operating increases the risk of an accident. Always inspect the vehicle before each use to make sure it's in safe operating condition.
Ensure proper operation
Brake system/pedal travel
Ensure proper operation
Ensure proper level
Brake light/tail lamp
Ensure operation of all signal lamps
Adjust mirrors for proper side and rear view
Check length of belt for damage, check latches for proper operation
Ensure free operation
Check tire condition and pressure
Latches (doors/seats/ accessory back)
Ensure all latches are secure
Ensure full charges, proper water levels, clean terminals
Inspect for proper cable routing, secure connections
Inspect, ensure fastener tightness
A rolling vehicle can cause serious injury or death. Always set the park brake when leaving the vehicle unattended.
Your vehicle comes with a reverse camera located on the rear-view mirror. Operation of the camera is automatic and is activated when the vehicle’s drive mode switch is in the reverse position.
Skidding or sliding can cause loss of control or rollover (if tires regain traction unexpectedly). When operating on slippery surfaces, reduce speed and use extra caution to reduce the chance of skidding or sliding out of control. Do not operate on excessively slippery surfaces.
Your vehicle has been designed to carry or tow specific capacities. Always read and understand the load distribution warnings listed on the warning labels. See Safety Labels and Location section in the Safety chapter.
The total load (operator, passenger, accessories, cargo and weight on hitch) must not exceed the maximum weight capacity of the vehicle.
The weight distribution of the cargo loaded onto the trailer is important and will have an impact on how the vehicle handles on the road. Ensure the weight of the cargo is distributed properly and the trailer is not rear, front, or side heavy.
Always use a spotter if you are uncomfortable loading the vehicle on your own. A wheel chock or marker can also be used as an indication of how close you will park the vehicle from the front of the trailer.
When loading or unloading a vehicle onto a trailer, always wear the appropriate safety gear.
Always secure cargo properly. Improperly securing a load can result in severe injury or death.
Securing devices, such as tie-down straps, are manufactured to support a load that can be applied during normal service. This is known as the Working Load Limit (WLL).
| Vehicle Type | Tie-Down Minimum WLL |
|---|---|
| All Vehicles | 3,300 lb (1497 kg) |
Follow these procedures when transporting the vehicle.
NOTICEDo not tow your GEM vehicle behind a car or other vehicle except on a trailer. Vehicle failures resulting from dolly towing will void warranty.
Cargo and other loose vehicle parts may fall off while transporting the vehicle. Secure or remove all cargo, and inspect the unit for loose parts prior to transport.
Do not exceed the towing vehicle's or trailer’s capacity when transporting. Refer to the towing vehicle and trailer’s specifications.
If transporting the vehicle in a non-enclosed trailer, the vehicle must FACE FORWARD. Failure to comply may allow airflow, vibration, or other factors to separate the roof from the vehicle and cause an accident, resulting in serious personal injury or death.
If transporting the vehicle in a non-enclosed trailer and the vehicle is equipped with hard doors, put all windows down.
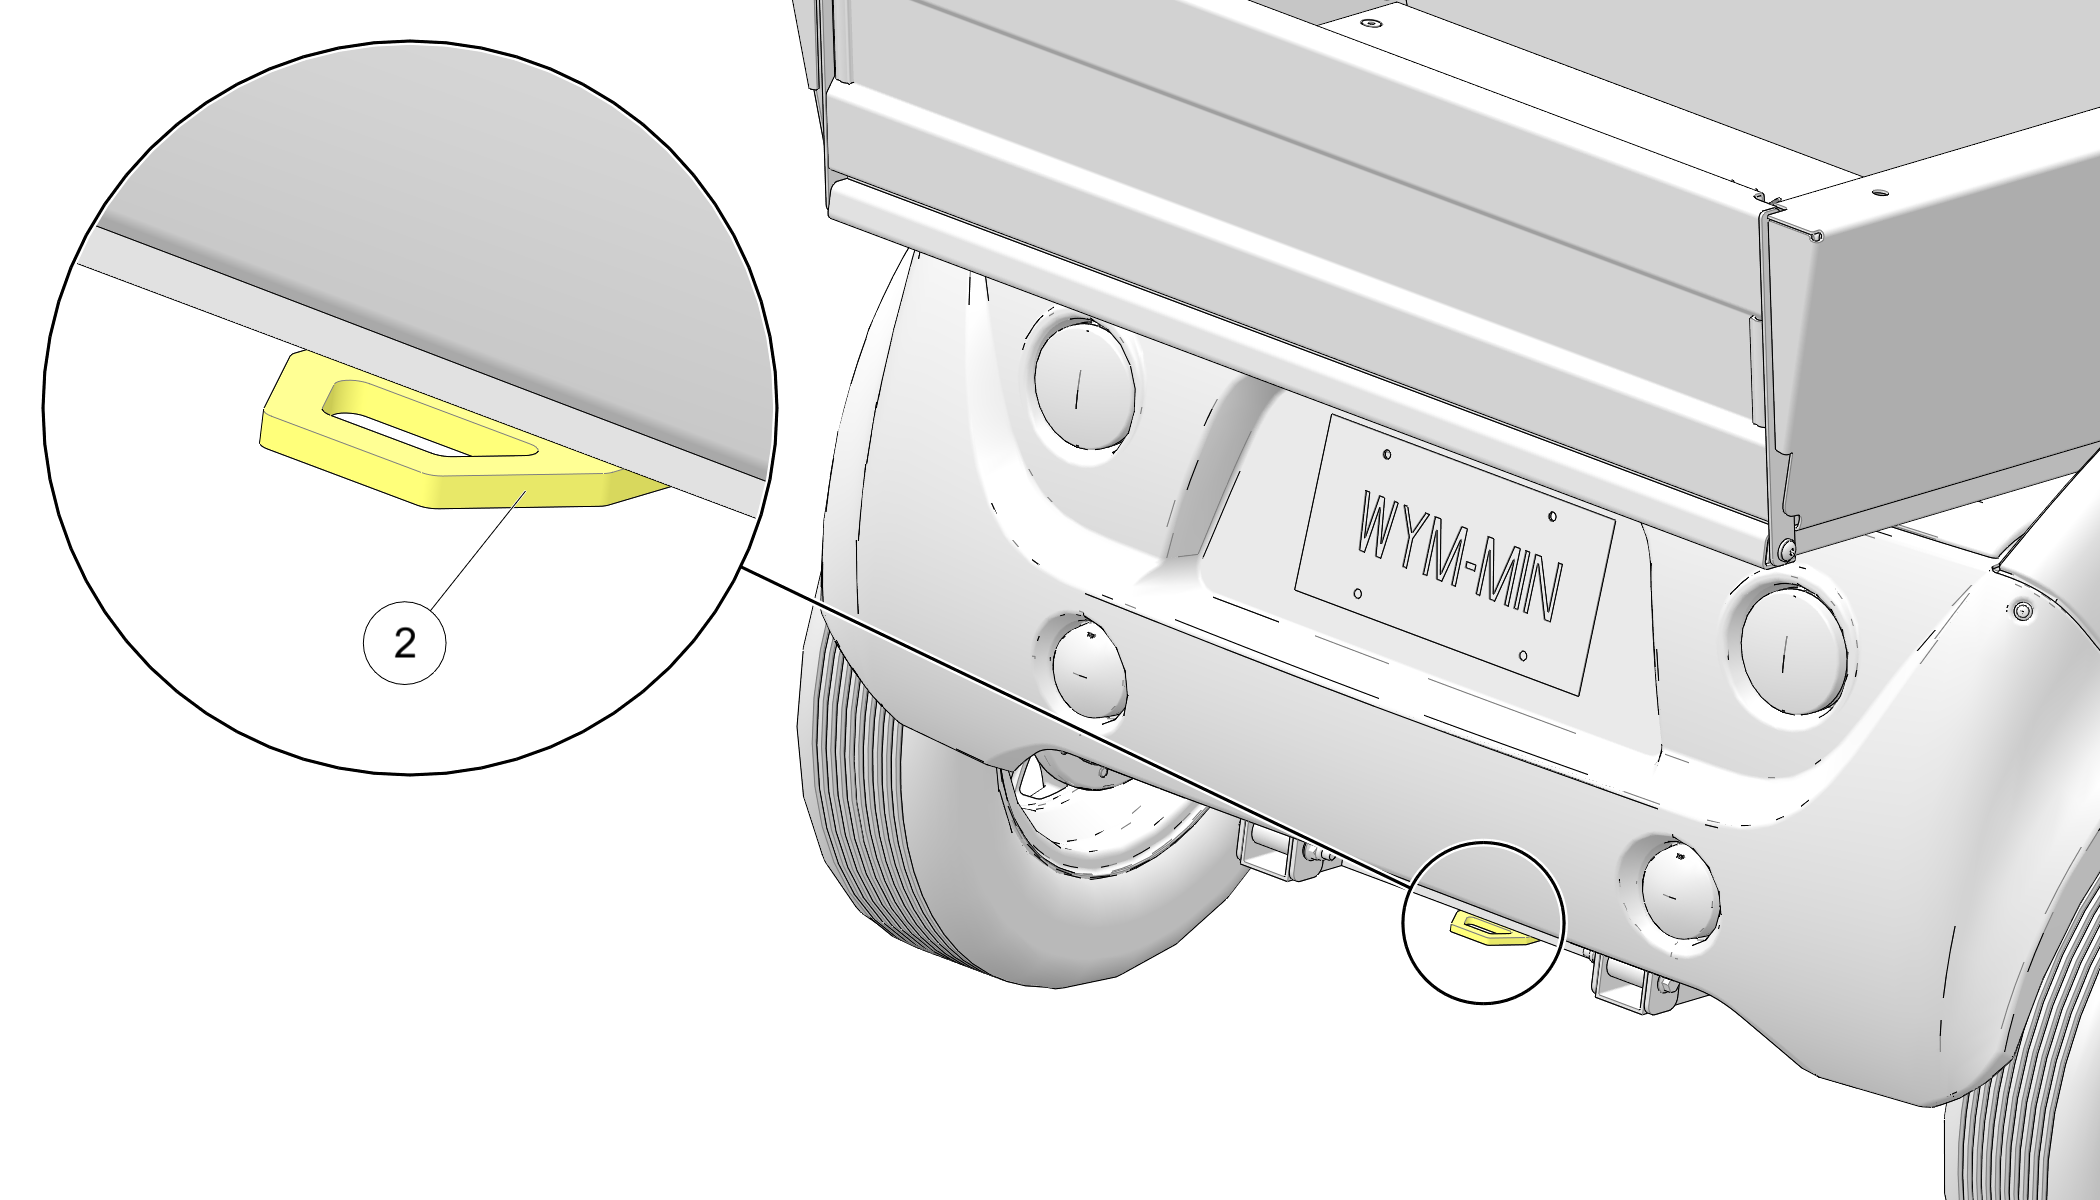
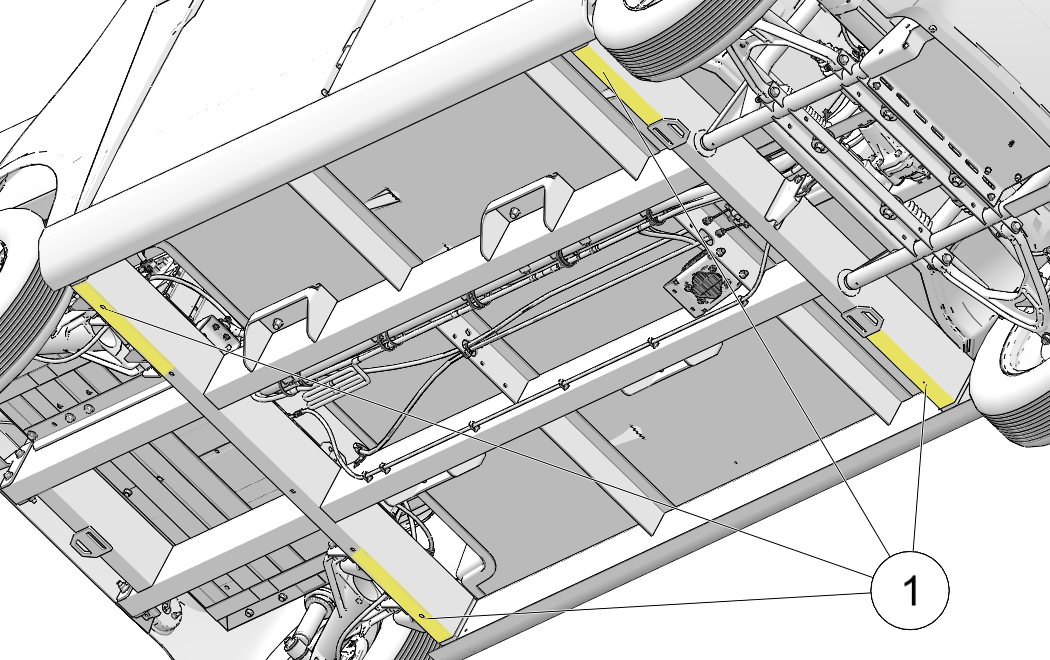
Always use the provided tie-down points. Not using the provided vehicle tie-down points could lead to premature component failure and/or excess wear on the tie-down straps.
Always secure the vehicle with at least four straps when trailering. Use two straps in the front, and two in the rear.
Never use chains to tie down the vehicle. Never place tie straps across any plastic body or floor panel components. Do not lay straps over any sharp edges. Sharp edges may damage straps during transportation. 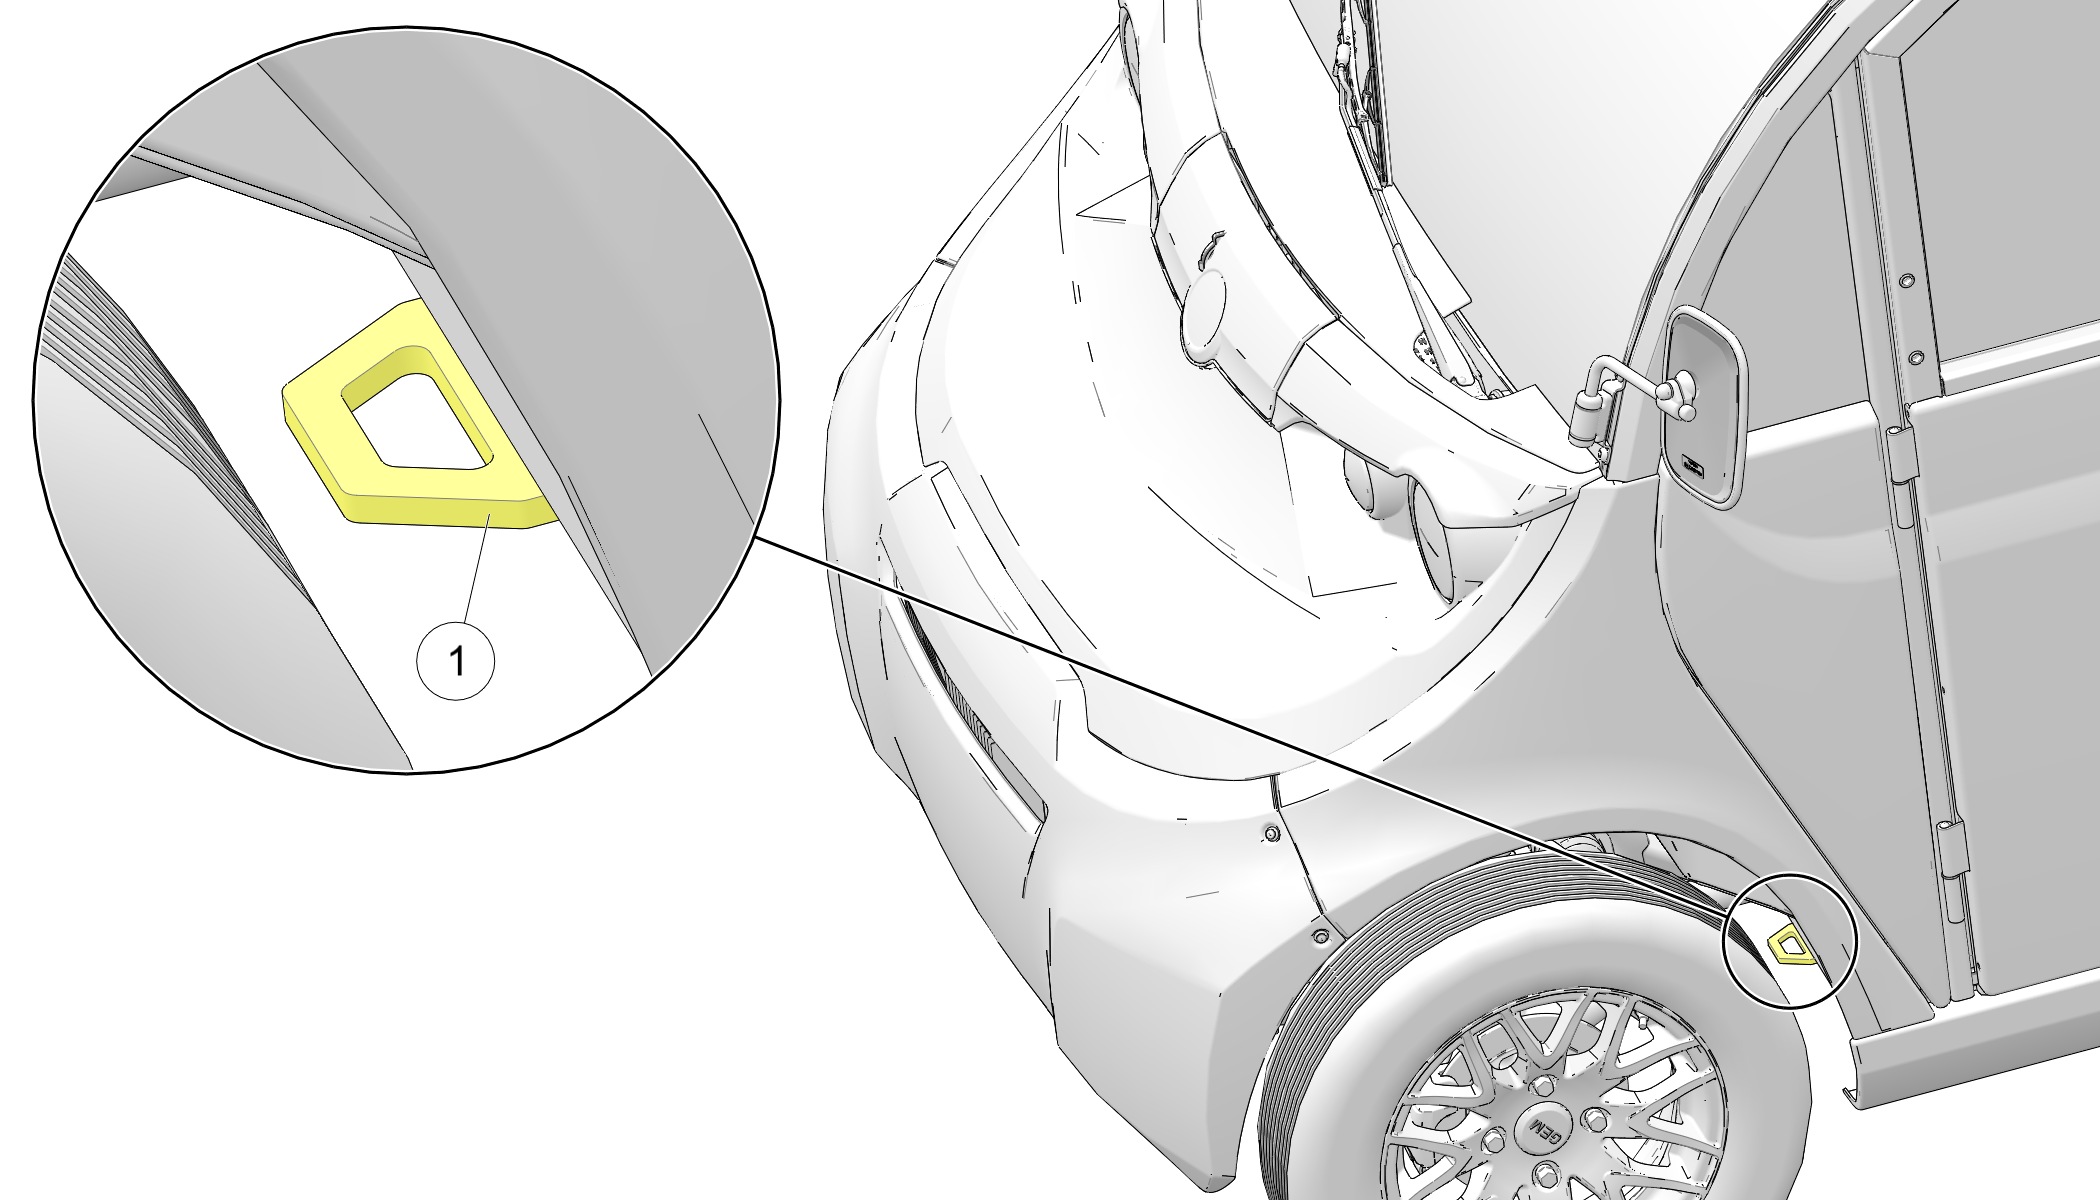
Always wear safety glasses or approved eye protection when servicing the vehicle. Wear a full-face shield and gloves when working with or around batteries and electrical connectors. Always use insulated tools when working with or near batteries. Failure to follow these instructions could result in serious injury or death.
NOTICEDamage to electrical connections and components will occur if they are unplugged before the service disconnect is unplugged.
Before servicing the vehicle’s electrical system, always unplug the service disconnect first, then disconnect any electrical accessory connections, then disconnect the negative cable from the 12-volt battery, then disconnect the negative terminal from the main battery pack. See Service Disconnect in the Features and Controls chapter.
Careful periodic maintenance will help keep your vehicle in the safest, most reliable condition. Inspect, clean, lubricate, adjust and replace parts as necessary. When inspection reveals the need for replacement parts, genuine GEM parts are available from your authorized GEM dealer.
Record maintenance and service in the Maintenance Log at the back of the book.
NOTICEService and adjustments are important for proper vehicle operation. If you're not familiar with safe service and adjustment procedures, your authorized GEM dealer can perform these operations.
Check cables and terminal connections
Check for worn insulation or frayed wires
Check battery hold-down bar to ensure batteries are tightly secured
Check tires for correct air pressure and wear
Check wheels for proper torque after first 100 mi (160 km) driven, and after first 100 mi (160 km) after any wheel if removed
Rotate wheels every 5000 mi (8000 km) , or more frequently if needed
Check brake fluid reservoir for proper brake fluid level.
Check brake lines for leaks.
Check seat belts for proper operation
Check headlights, horn, turn signals, windshield wiper and brake lights for proper operation.
Check steering wheel freeplay

Inspect the brake system routinely. Inspect the brake fluid level before each operation. If the level drops between fluid checks, add brake fluid as needed. Your authorized GEM dealer can provide service.
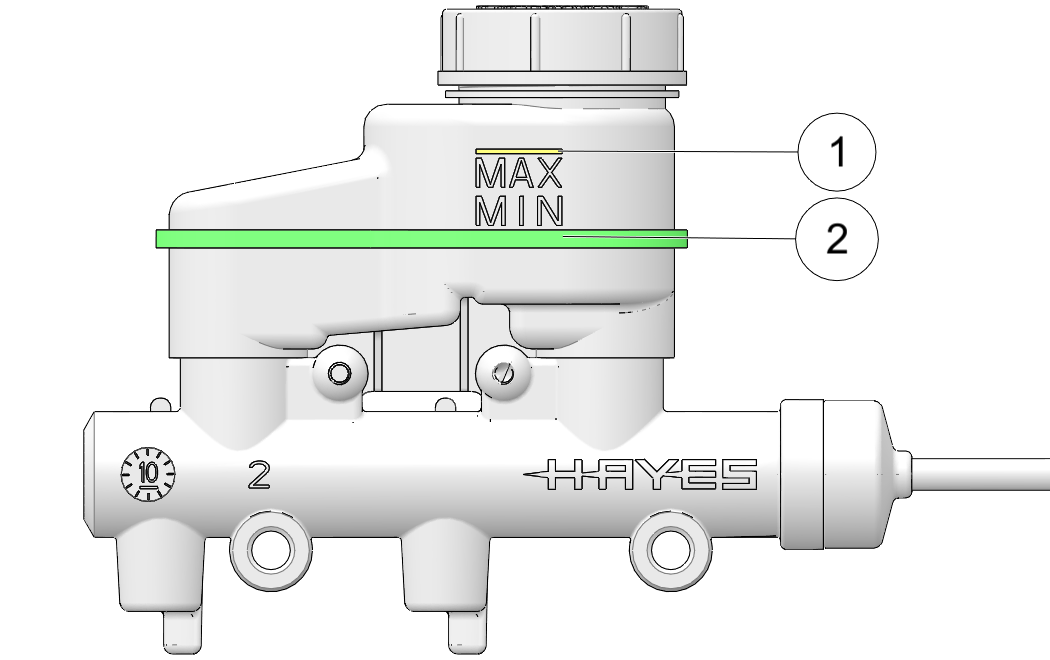
Change the brake fluid every two years and any time the fluid becomes contaminated, the fluid level is below the minimum, or if the type and brand of the fluid in the reservoir are unknown. Always use DOT4 brake fluid.
After opening a bottle of brake fluid, always discard any unused portion. Never store or use a partial bottle. Brake fluid is hygroscopic, meaning it rapidly absorbs moisture from the air. The moisture causes the boiling temperature of the brake fluid to drop, which can lead to early brake fade and the possibility of accident or severe injury.
NOTICEBrake fluid may cause damage to painted and finished surfaces. Use caution when refilling the brake fluid reservoir.
Some maintenance procedures require removal of the upper dash to access components.
If you experience electrical failures not related to the batteries, a fuse may need replacement. Locate and correct any short circuits that may have caused the blown fuse, then replace the fuse. If you suspect a relay or diode needs replacement, your authorized GEM dealer can assist.
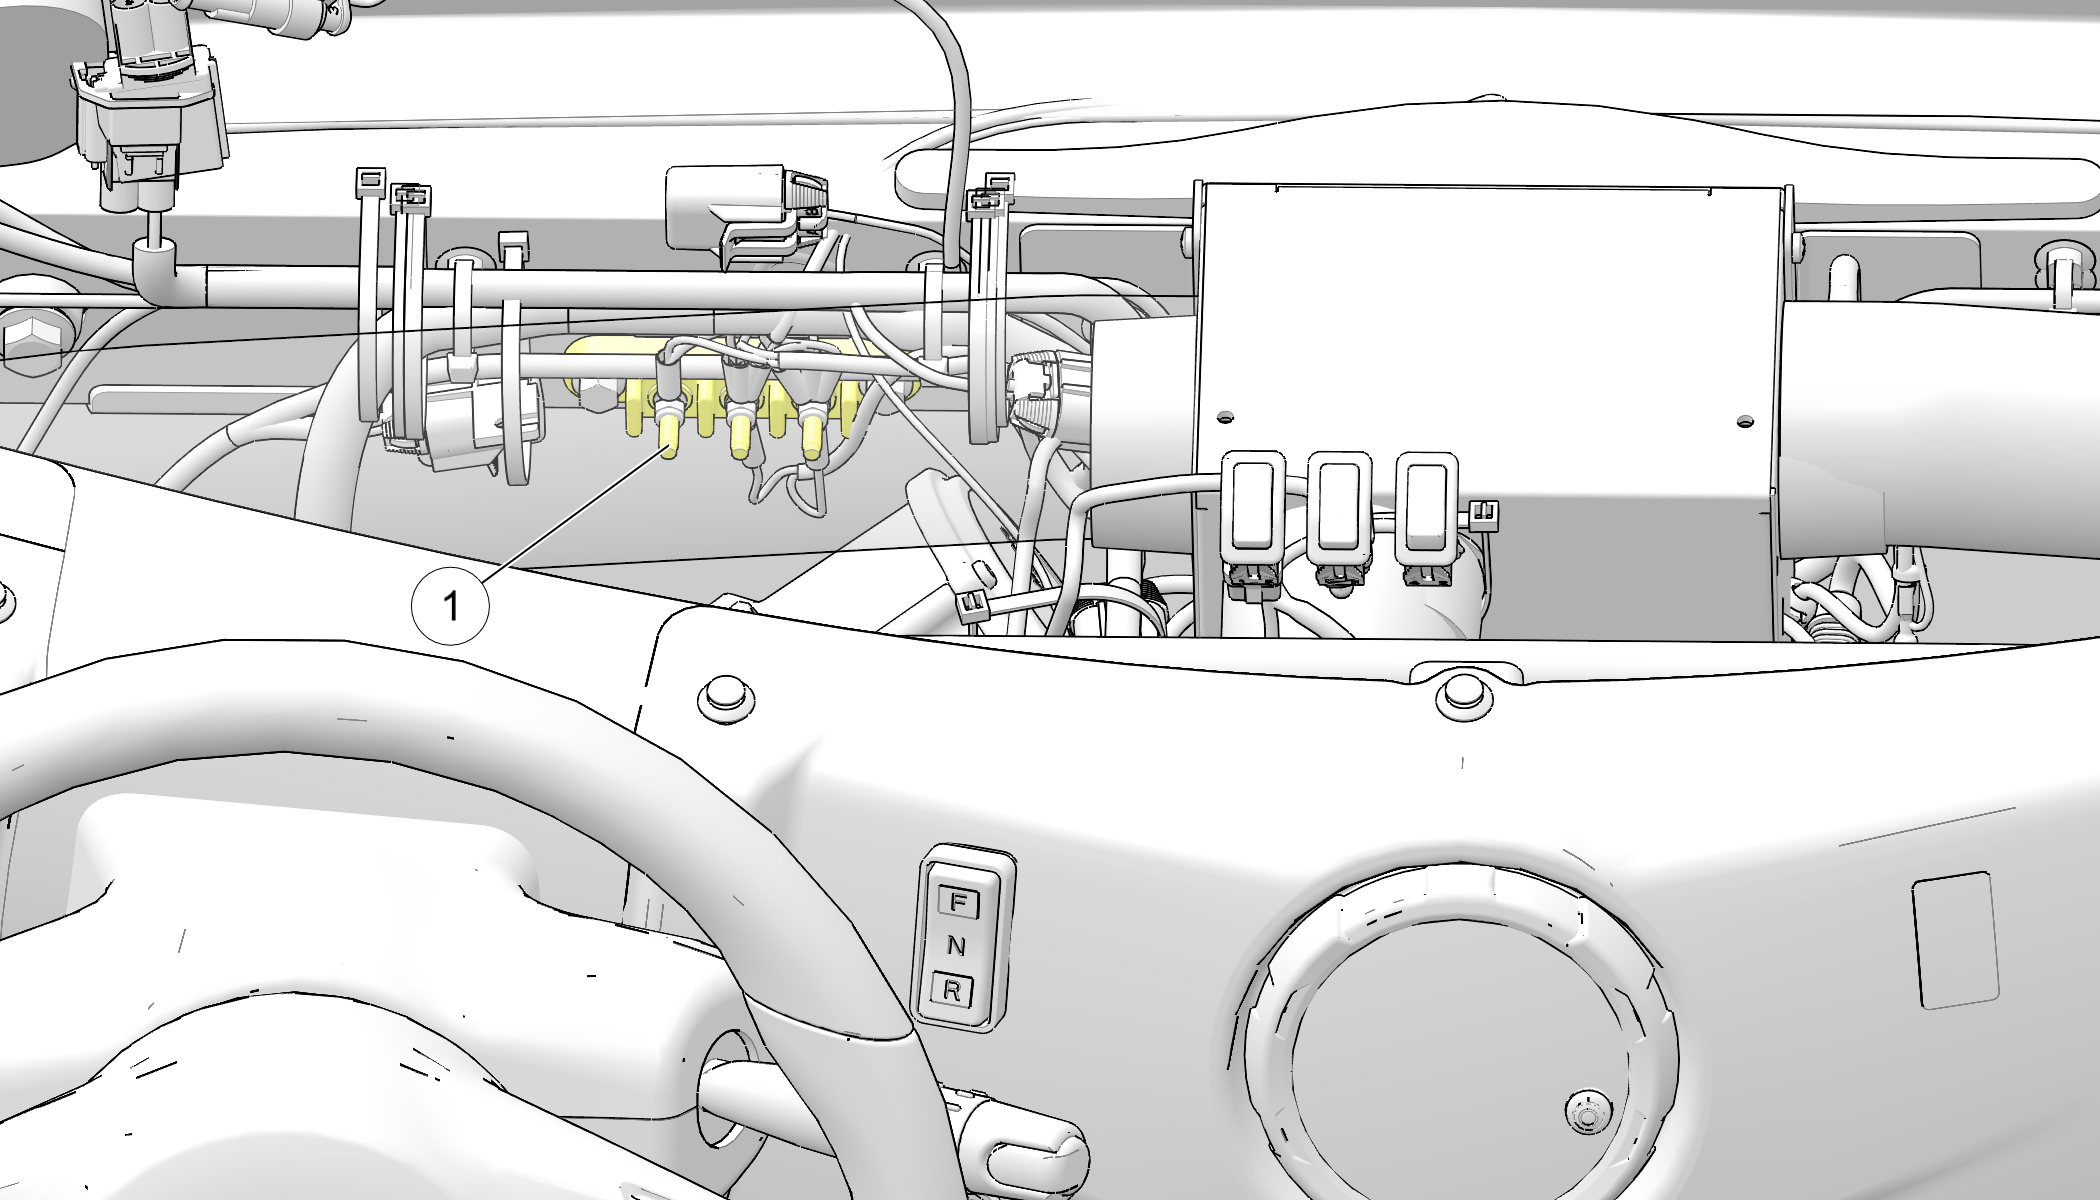
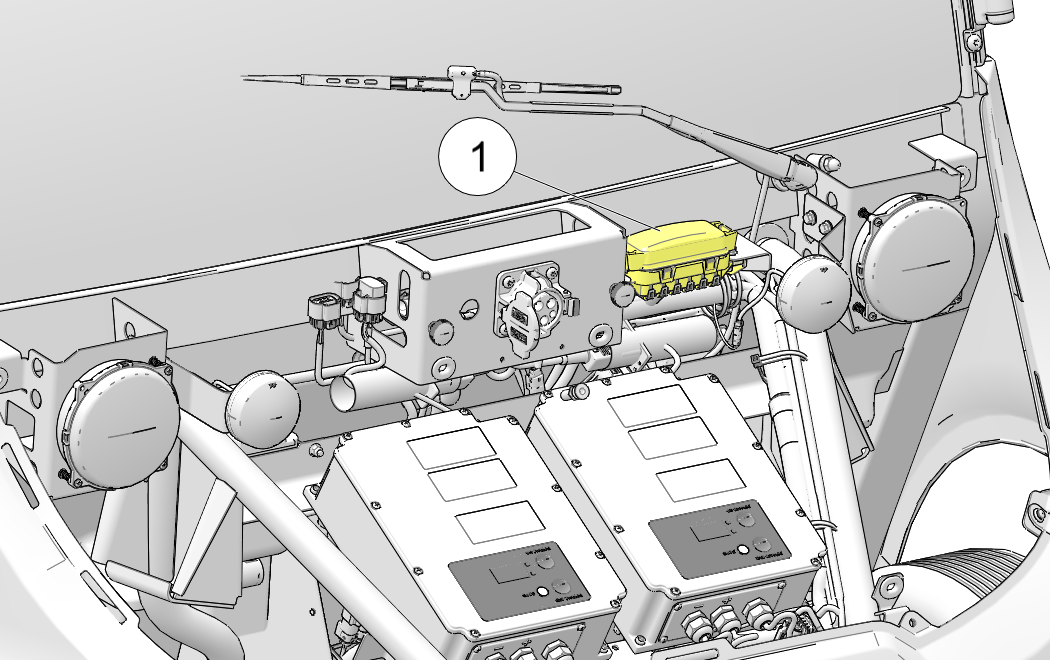
Open the hood to access the fuse box 1 . See the label attached to the fuse box cover for the function and amp rating of each fuse.
Before servicing the vehicle’s electrical system, always unplug the service disconnect first, then disconnect any electrical accessory connections, then disconnect the negative cable from the 12-volt battery, then disconnect the negative terminal from the main battery pack. See Service Disconnect section in the Features and Control Chapter.
Standard 12V Fuses
Drive; Constant; Internal Lighting
12V Fuse Center
12V Fuse Center
Wiper; ACC; Lights
12V Fuse Center
12V Fuse Center
12V Fuse Center
Near the 12V Battery
Optional 12V Fuses
Security Light Harness
Under Dash Lighting
Under Dash Light Harness
Standard 48V Fuses
Motor Controller/ BMC
48V Fuse Center
48V Fuse Center
48V Fuse Center
Optional 48V Fuses
Heater Heating Element
NOTICE12V fuses must not be used in 48V applications. 48V fuses must not be used in 12V applications. Always install fuses with the recommended amperage to avoid damage to the electrical system.
Operating your vehicle with worn tires, improperly inflated tires, non-standard tires or improperly installed tires will affect vehicle handling and could cause an accident resulting in serious injury or death. Always follow all tire maintenance procedures as outlined in this manual and on the labels on the vehicle. Always use original equipment size and type when replacing tires.
Proper tire pressure is essential to the safe and comfortable operation of your vehicle. Check tire pressure daily, or before each use of the vehicle. For recommended tire pressures, see the manufacturer’s label on your vehicle or the specifications section.
NOTICEAfter inspecting or adjusting the tire pressure, always reinstall the valve stem cap (if equipped). This will prevent moisture and dirt from entering the valve stem, which could cause damage.
Any accelerated wear of tires may be an indicator of improper alignment or poor driving habits. Your authorized GEM dealer can assist.
Rotate wheels every 5000 mi (8000 km) , or more frequently if needed.
Always replace tires when tread depth is worn to 1/8 in (3 mm) or less. 1
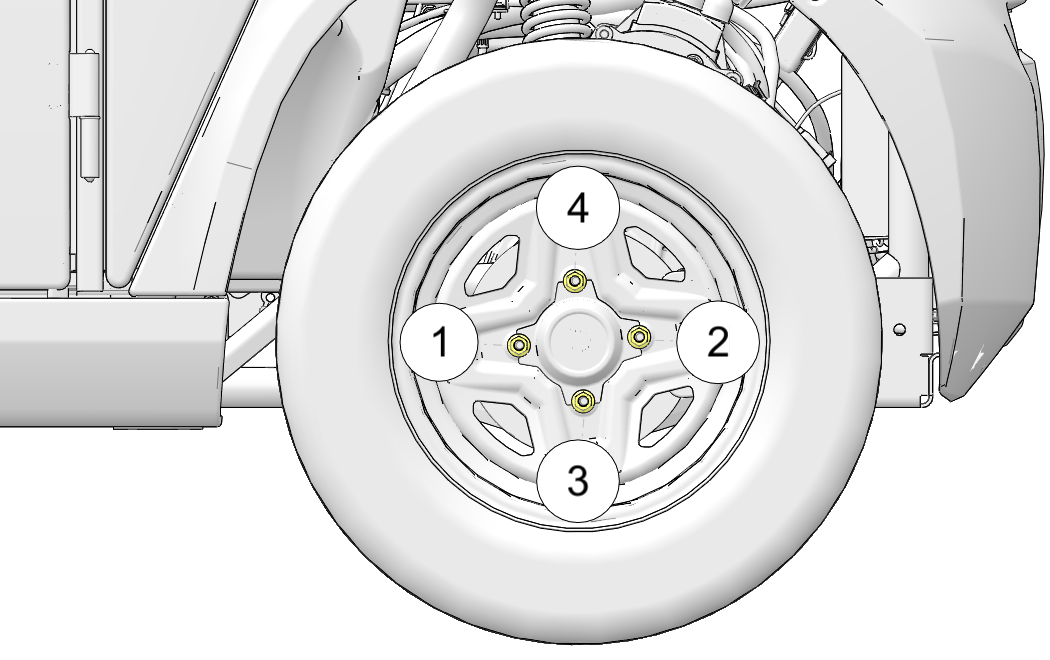
Inspect the following items occasionally for tightness, and if they've been loosened for maintenance service. Do not lubricate the stud, the lug nut, or the washers (washers equipped on vehicles with factory steel wheels).
Check wheels for proper torque after first 100 mi (160 km) driven and the first 100 mi (160 km) after any wheel is removed.
A falling vehicle can cause serious injury or death. Never place any part of your body under an elevated vehicle. If you need access to the bottom of the vehicle, use automotive jack stands to support the vehicle on a firm, level surface. Your authorized GEM dealer can assist.
Jacking at any location other than the recommended jacking points may cause significant damage to the vehicle frame and body.
Improperly installed wheels can adversely affect tire wear and vehicle handling, which can result in serious injury or death. Always ensure that all nuts are torqued to specification. Do not service axle nuts that have a cotter pin installed. Your authorized GEM dealer can provide service.
NOTICETo ensure that the washers fully seat in the wheel taper, use other hand to position and center wheel, if necessary.
A secondary dealer representative must verify that all sixteen flange nuts 1 only contact the cone washers 2 and are not in contact with the rim. Mark each flange nut with a paint pen when verified correct.
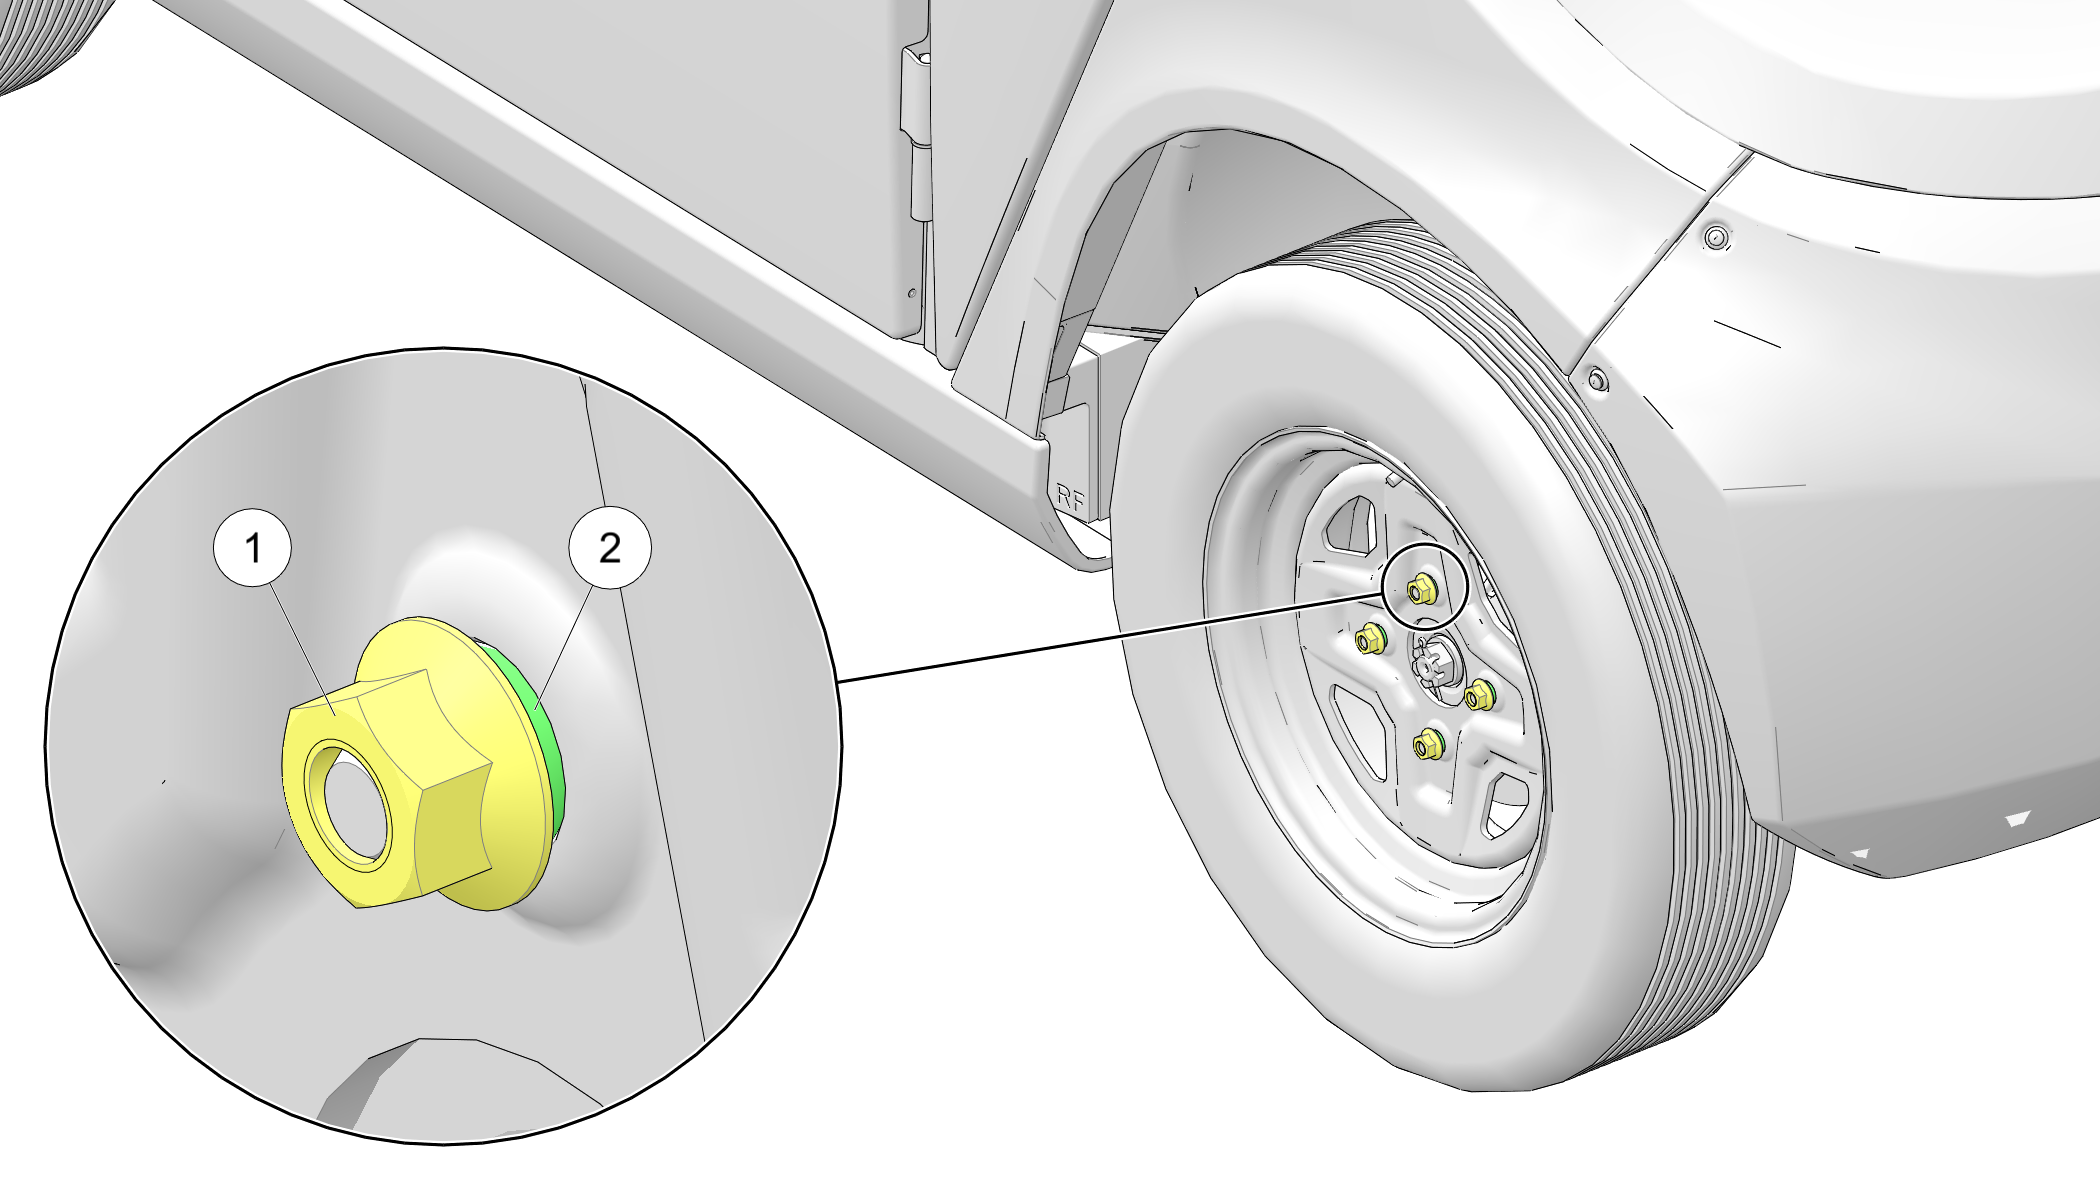
Flange nuts are tight and only in contact with the cone washers.

Flange nuts and cone washers are loose. The wheel is not secure.

Flange nuts are contacting the rim. Flange nuts and cone washers are over tightened.
Poor lighting can result in reduced visibility when driving. Headlight and taillight lenses become dirty during normal operation. Clean lights frequently and replace burned out lamps promptly. Do not operate this vehicle at night or in low light conditions until the headlight is replaced. Always make sure lights are adjusted properly for best visibility.
If an LED light fails to work properly, the entire assembly must be replaced. Your authorized GEM dealer can provide service.
The voltage in the battery pack is sufficient to cause death by electrocution. With the exception of battery inspections , never attempt to perform service on the electric drive system, including the battery pack, unless you are properly trained to work on electrical systems. Your authorized GEM dealer can provide battery-related service.
Battery posts, terminals and related components contain lead and lead compounds, chemicals known to cause cancer and reproductive harm. Always wash your hands after touching or handling the batteries.
Charging a damaged battery can result in serious injury. Never attempt to charge a frozen or bulging battery. Discard the battery appropriately and install a new battery.
Battery electrolyte is poisonous. It contains sulfuric acid. Serious burns can result from contact with skin, eyes or clothing.
External: Flush with water.
Internal: Drink large quantities of water or milk. Follow with milk of magnesia, beaten egg, or vegetable oil. Call physician immediately.
Eyes: Flush with water for 15 minutes and get prompt medical attention.
Batteries produce explosive gases. Keep sparks, flame, cigarettes, etc. away. Ventilate when charging or using in an enclosed space. Always shield eyes when working near batteries. KEEP OUT OF REACH OF CHILDREN.
Before accessing the batteries, make sure any wire or metal items remain clear of the battery compartment to avoid causing a short circuit to the electrical system.
To access the battery pack, remove any rear accessory back installed on the vehicle. See Rear Accessory Backs (Option). Release the battery pack access cover fasteners and remove the cover.
All Battery Configurations
Under rear compartment
Under rear compartment
Under rear compartment
Under rear bed compartment
Do not work in or near the battery compartment or on any other electrical component of the vehicle while charging the batteries. Before servicing the vehicle’s electrical system, always unplug the service disconnect first, then disconnect any electrical accessory connections, then disconnect the negative cable from the 12-volt battery, then disconnect the negative terminal from the main battery pack. This will disable the vehicle by disconnecting the battery pack from the motor. It does not disable the battery pack. HIGH VOLTAGE will be present at the battery terminals. HIGH BATTERY VOLTAGE IS ALWAYS PRESENT. DO NOT TOUCH THE BATTERY TERMINALS.
Improper handling of high voltage wiring, batteries or control systems could result in serious injury or death by electric shock. Only qualified GEM technicians should repair or access high voltage wiring, battery packs and associated systems.
Inspect and clean battery terminal connections monthly. Carefully remove corrosion with a stiff wire brush. Coat battery terminals with dielectric grease or petroleum jelly. Using an insulated wrench, torque bolts to 8 ft-lbs (10.8 N·m) .
Check the battery compartment for any signs of worn insulation, frayed cables or damaged cable ends. If found, see your authorized GEM dealer or other qualified service person for service before operating.
If battery cable ends are damaged or corroded, they should be replaced or cleaned as necessary. Failure to do so may cause them to overheat during operation, possibly leading to fire, which may result in serious injury or death.
Battery hold-down bars should be snug to keep batteries from moving while the vehicle is in motion, but not so tight as to crack or buckle the battery case. Torque fasteners to 9.5 ft-lbs (13 N·m) .
Handling batteries and electrical components improperly can result in serious injury or death. Do not attempt to remove batteries or battery cables. Battery posts are identified on the battery case as positive (+) and negative (-). Your authorized GEM dealer can provide battery-related service.
With proper care and maintenance, as outlined in this owner’s manual, battery life can be maximized, but the battery will eventually reach the end of its useful life. When battery replacement is necessary, your authorized GEM dealer can provide this service.
NOTICEAlways install batteries of the exact type and make originally supplied with the vehicle to prevent damage to the vehicle’s electrical system.
When the vehicle will not be used for a period of 10 days or longer, perform one of the battery storage procedures listed in the chart below.
NOTICEIf ambient temperatures could drop below freezing during the storage of a vehicle equipped with lithium-ion batteries, refer to the cold battery performance information beginning on BRAMMO® Lithium-Ion Cold Battery Performance.
Battery Storage Options
Less than 10 days
Fully charge the batteries, park the vehicle and turn the ignition key off. The battery will lose some of its charge during this period.
10 days to 24 weeks
Leave the charger connected. See Batteries section in Features and Control chapter.
Indefinitely or Unknown
Disconnect the charger and arrange for monthly charging.
Your vehicle is equipped with an auxiliary battery under the dash. When the main battery is connected to a charger, the auxiliary battery is charged along with the main battery. During long-term storage (24 weeks or longer) when the main battery is not connected to a charger, the auxiliary battery must be trickle charged. If the vehicle does not operate upon removal from storage, be sure to check the auxiliary battery voltage first.
Use a liquid household glass cleaner to remove normal dust and dirt. To remove oil, grease or road tar, use isopropyl alcohol, then wash these surfaces with water. Dry gently with a soft cloth or chamois.
NOTICEBe very careful when cleaning acrylic surfaces as they can be scratched or damaged. Do not use a cleaner with an abrasive, a combination cleaner and wax or any solvent that contains ethyl or methyl alcohol. Do not use products containing ammonia, soaps, or abrasives. Never use gasoline or cleaning solvent. These products scratch or destroy acrylic surfaces.
Do not allow excess water to pool in the seams or anywhere else on the seat.
Do not use harsh chemicals.
Do not use abrasives to remove dirt or debris.
Using a circular motion, remove excess dirt from seats with a clean, damp cloth and warm water. Substances such as tar, asphalt and other soils will stain if not removed quickly. Use a clean cloth and solvent type vinyl cleaner, then wash the area thoroughly with a damp cloth and mild liquid detergent. Rinse with cool water. Towel dry any remaining water.
Use mild liquid detergent and warm water to clean the interior. Remove detergent or deposits with a clean, damp cloth.
NOTICEDo not spray the interior of your vehicle. Liquids can damage electrical components and the circuit board. Handle liquids with care. Do not spray water directly into the upper or lower console.
Do not use high-pressure water on seats or any interior components.
Make any necessary repairs and clean the vehicle as recommended.
Inspect the fluid levels. Add or change fluids as recommended. Change brake fluid every two years and any time the fluid looks dark or contaminated.
Batteries can be permanently damaged (and the warranty voided) if allowed to remain in a low state of charge. Fully charge batteries before storing. In hot climates, battery self-discharge will increase. In cold climates, batteries could freeze if not properly charged.
Do not cover the vehicle while the charger is connected. Dangerous levels of hydrogen gas could accumulate.
Load Capacity
Payload Capacity (occupants, cargo, options)
Gross Vehicle Weight Rating (GVWR)
1999 lb (906.7 kg)
2499 lb (1133.5 kg)
Gross Axle Weight Rating (GAWR), Front and Rear
Performance
5 kW (optional 6.5 kW) AC electric
13.3 kW (optional 18.5 kW)
Sevcon 450A AC Controller
Varies with conditions
17.05:1 Single speed
Standard 1 kW, 120/240V input (optional 3 kW or 6 kW, SAE J1772)
Brake System
4-Wheel hydraulic brakes, disc front, drum rear
Dash-mounted lever-activated mechanical park brake
Independent w/coil over shock
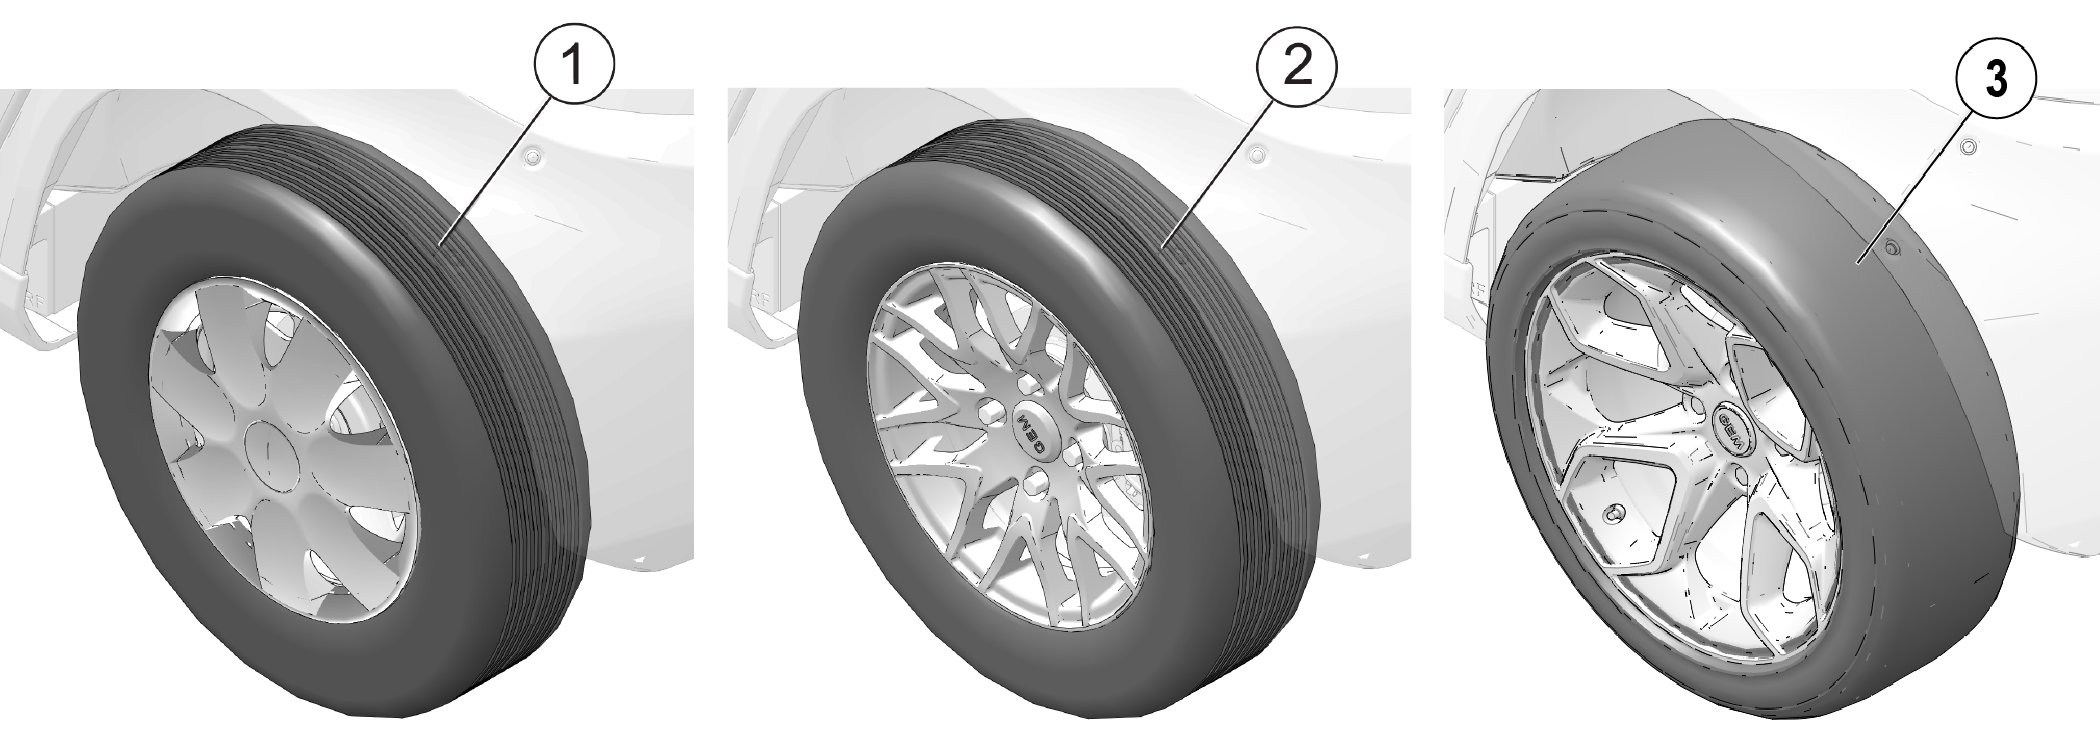
13 in. Rim: 155/80R13
14 in. Rim: 165/70R14
16 in. Rim: 195/45R16
Load Capacity
Payload Capacity (occupants, cargo, options)
Gross Vehicle Weight Rating (GVWR)
2999 lb (1360.3 kg)
2999 lb (1360.3 kg)
Gross Axle Weight Rating (GAWR), Front and Rear
Performance
6.5 kW AC electric
Sevcon 450A AC Controller
Varies with conditions
17.05:1 Single speed
Standard 1 kW, 120/240V input (optional 3 kW or 6 kW, SAE J1772)
Brake System
4-Wheel hydraulic brakes, disc front, drum rear
Console-mounted lever-activated mechanical park brake
Independent w/coil over shock
13” Rim: 155/80R13
14” Rim: 165/70R14
16” Rim: 195/45R16
Polaris Industries Inc., 2100 Highway 55, Medina, MN 55340, gives a TWO-YEAR/ 8,000 mi (12,900 km) , whichever comes first, LIMITED WARRANTY on all components (except batteries) of your GEM vehicle against defects in material or workmanship. Mileage is unlimited for the first 6 months of the vehicle warranty. Any time after month 6, the vehicle warranty expires at 8,000 mi (12,900 km) or at the end of the two-year period, whichever comes first. This warranty covers the parts and labor charges for repair or replacement of defective parts and begins on the date of purchase by the original retail purchaser. This warranty is transferable to another consumer during the warranty period through a GEM dealer, but any such transfer will not extend the original term of either warranty. The duration of this warranty and/or the battery warranty may vary by international region based upon local laws and regulations.
Battery coverage in this Limited Warranty begins on the date of purchase by the original retail purchaser and continues for twenty-four months or 8,000 mi (12,900 km) , whichever comes first. Mileage is unlimited for the first 6 months of the battery warranty. Any time after month 6, the battery warranty expires at 8,000 mi (12,900 km) or at the end of the two-year period, whichever comes first. During this time period, Polaris warrants your vehicle’s batteries against defects in materials or workmanship. After the first six months in service, a defective battery will be replaced on a manufacturer/customer shared basis provided that the warranty limit of 8,000 mi (12,900 km) has not yet occurred. Review the table below for guidelines.
TERM FOR VEHICLES WITH LESS THAN 8,000 mi (12,900 km)
WARRANTY COVERAGE
FOR LEAD ACID BATTERIES DEEMED DEFECTIVE BY GEM
Purchase Date - 6th Month of Service
100% of the cost of an approved GEM battery at a GEM dealer
7th - 12th Month of Service
75% of the cost of an approved GEM battery at a GEM dealer
13th - 18th Month of Service
50% of the cost of an approved GEM battery at a GEM dealer
19th - 24th Month of Service
25% of the cost of an approved GEM battery at a GEM dealer
Polaris Industries Inc. gives a FIVE-YEAR/ 30,000 mi (48,300 km) LIMITED parts and labor warranty on the battery pack against defects in material or workmanship on your GEM vehicle. The FIVE-YEAR/ 30,000 mi (48,300 km) term begins on the purchase date, is fully transferable and has no deductible. The term ends 5 years after purchase, or after 30,000 mi (48,300 km) , whichever occurs first.
All batteries experience some reduction in capacity/range over time. A capacity/range reduction of 30% or less during the battery warranty period does not constitute a defect. Any capacity/range reduction-based claim must be confirmed by an authorized GEM dealer and approved by Polaris to be eligible for coverage. In addition to the WARRANTY COVERAGE EXCLUSIONS listed below, the battery warranty also excludes failure, damage or capacity loss to the batteries caused by neglect, lack of charging or not following the recommended maintenance schedule outlined in the Owner’s Manual. This Li-ion battery warranty is limited to the Li-ion batteries themselves, and does not include the other Li-ion system components.
At the time of sale, the Warranty Registration Form must be completed by your dealer and submitted to Polaris within three days. Upon receipt of this registration, Polaris will record the registration for warranty. No verification of registration will be sent to the purchaser as the copy of the Warranty Registration Form will be the warranty entitlement. If you have not signed the original registration and received the customer copy, please contact your dealer immediately. NO WARRANTY COVERAGE WILL BE ALLOWED UNLESS YOUR VEHICLE IS REGISTERED WITH POLARIS. Initial dealer preparation and set-up of your vehicle is very important in ensuring trouble-free operation. Purchasing a vehicle in the crate or without proper dealer set-up will void your warranty coverage.
This Polaris limited warranty excludes any failures that are not caused by a defect in material or workmanship. THIS WARRANTY DOES NOT COVER CLAIMS OF DEFECTIVE DESIGN. This warranty also does not cover acts of God, accidental damage, normal wear and tear, abuse or improper handling. This warranty also does not cover any vehicle, component, or part that has been altered structurally, modified, neglected, improperly maintained or used for racing, competition or purposes other than for which it was designed, or for any damages which occur during trailer transit or as a result of unauthorized service or the use of unauthorized parts.
This warranty excludes damages or failures resulting from improper lubrication; corrosion; improper engine timing; improper fuel; surface imperfections caused by external stress, heat, cold or contamination; operator error or abuse; improper component alignment, tension, adjustment or altitude compensation; snow, water, dirt or other foreign substance ingestion/contamination; improper maintenance; modified components; use of aftermarket or unapproved components, accessories, or attachments; use of unapproved software or calibration; unauthorized repairs; or repairs made after the warranty period expires or by an unauthorized repair center.
This warranty excludes damages or failures caused by abuse, accident, fire, explosion, or any other cause other than a defect in materials or workmanship and provides no coverage for consumable components, general wear items, or any parts exposed to friction surfaces, stresses, environmental conditions and/or contamination for which they were not designed or not intended, including but not limited to the following items:
This warranty provides no coverage for personal loss or expense, including mileage, transportation costs, hotels, meals, shipping or handling fees, product pick-up or delivery, replacement rentals, loss of product use, loss of profits, or loss of vacation or personal time.
THE EXCLUSIVE REMEDY FOR BREACH OF THIS WARRANTY SHALL BE, AT POLARIS' OPTION, REPAIR OR REPLACEMENT OF ANY DEFECTIVE MATERIALS, COMPONENTS, OR PRODUCTS. THE REMEDIES SET FORTH IN THIS WARRANTY ARE THE ONLY REMEDIES AVAILABLE TO ANY PERSON FOR BREACH OF THIS WARRANTY. POLARIS SHALL HAVE NO LIABILITY TO ANY PERSON FOR INCIDENTAL, CONSEQUENTIAL OR SPECIAL DAMAGES OF ANY DESCRIPTION, WHETHER ARISING OUT OF EXPRESS OR IMPLIED WARRANTY OR ANY OTHER CONTRACT, NEGLIGENCE, OR OTHER TORT OR OTHERWISE. THIS EXCLUSION OF CONSEQUENTIAL, INCIDENTAL, AND SPECIAL DAMAGES IS INDEPENDENT FROM AND SHALL SURVIVE ANY FINDING THAT THE EXCLUSIVE REMEDY FAILED OF ITS ESSENTIAL PURPOSE.
THE IMPLIED WARRANTY OF FITNESS FOR A PARTICULAR PURPOSE IS EXCLUDED FROM THIS LIMITED WARRANTY. ALL OTHER IMPLIED WARRANTIES (INCLUDING BUT NOT LIMITED TO THE IMPLIED WARRANTY OF MERCHANTABILITY) ARE LIMITED IN DURATION TO THE ABOVE WARRANTY PERIODS. POLARIS DISCLAIMS ALL EXPRESS WARRANTIES NOT STATED IN THIS WARRANTY. SOME STATES DO NOT PERMIT THE EXCLUSION OR LIMITATION OF INCIDENTAL OR CONSEQUENTIAL DAMAGES OR ALLOW LIMITATIONS ON THE DURATION OF IMPLIED WARRANTIES, SO THE ABOVE LIMITATIONS MAY NOT APPLY TO YOU IF INCONSISTENT WITH CONTROLLING STATE LAW.
If your vehicle requires warranty service, you must take it to a GEM Servicing Dealer. When requesting warranty service you must present your copy of the Warranty Registration From to the dealer. (THE COST OF TRANSPORTATION TO AND FROM THE DEALER IS YOUR RESPONSIBILITY). POLARIS suggests that you use your original selling dealer; however, you may use any GEM Servicing Dealer to perform warranty service.
In the country where your product was purchased:
Warranty or Service Bulletin repairs must be done by an authorized GEM dealer. If you move or are traveling within the country where your product was purchased, Warranty and Service Bulletin repairs may be requested from any authorized GEM dealer that sells the same line as your product.
Outside the country where your product was purchased:
If you are traveling temporarily outside the country where your product was purchased, you should take your product to an authorized GEM dealer. You must show the dealer photo identification from the country of the selling dealer’s authorized location as proof of residence. Upon residence verification, the servicing dealer will be authorized to perform the warranty repair.
If you move:
If you move to another country, be sure to contact GEM Customer Assistance and the customs department of the destination country before you move. Product importation rules vary considerably from country to country. You may be required to present documentation of your move to GEM in order to continue your warranty coverage. You may also be required to obtain documentation from GEM in order to register your product in your new country. You should warranty register your product at a local GEM dealer in your new country immediately after you move to continue your warranty coverage and to ensure that you receive information and notices regarding your vehicle.
If you purchase from a private party:
If you purchase a GEM vehicle from a private party, to be kept and used outside of the country in which the product was originally purchased, all warranty coverage will be denied. You must nonetheless register your product under your name and address with a local GEM dealer in your country to ensure that you receive safety information and notices regarding your product.
EXCEPT WHERE SPECIFICALLY REQUIRED BY LAW, THERE IS NO WARRANTY OR SERVICE BULLETIN COVERAGE ON THIS PRODUCT IF IT IS SOLD OUTSIDE THE COUNTRY OF THE SELLING DEALER’S AUTHORIZED LOCATION. This policy does not apply to products that have received authorization for export from POLARIS. Dealers may not give authorization for export. You should consult an authorized dealer to determine this product’s warranty or service coverage if you have any questions. This policy does not apply to products registered to government officials or military personnel on assignment outside the country of the selling dealer’s authorized location. This policy does not apply to Safety Bulletins.
If your product is registered outside of the country where it was purchased and you have not followed the procedure set above, your product will no longer be eligible for warranty or service bulletin coverage of any kind, other than safety recalls. Products registered to government officials or military personnel on assignment outside of the country where the product was purchased will continue to be covered by the Limited Warranty.
Please work with your dealer to resolve any warranty issues. Dealership contacts can be found via this website, if needed:
www.polaris.com/en-us/contact
Should your dealer require any additional assistance, they will contact the appropriate person at POLARIS.
This warranty gives you specific legal rights, and you may also have other rights which vary from state to state or in different countries. If any of the above terms are void because of federal, state, local law, all other warranty terms will remain in effect.
For questions call POLARIS Owner Connections:
United States & Canada: 1-800-POLARIS (1-800-765-2747)
To report a safety defect to Transport Canada, you may either fill out an online defect complaint form at their website:
English: http://www.tc.gc.ca/recalls
French: http://www.tc.gc.ca/rappels
Or contact their Defect Investigations and Recalls Division by calling toll-free 1-800-333-0510 (Canada) or 819-994-3328 (Ottawa-Gatineau area / International).
Phone: 855–RIDEGEM (855–743–3436)
Web: www.gemcar.com
Emergency roadside assistance is available to you 24 hours a day, 365 days a year, throughout the United States and Canada during the term of the manufacturer’s base warranty. This service is available through Nation Motor Club, LLC d/b/a Nation Safe Drivers®*. Up to two trips per year are covered, for up to 100 mi (160 km) each. A trip includes towing from your vehicle’s location to the nearest GEM dealer, a second trip can be used to return the vehicle from the GEM dealer to your location. Your VIN is your vehicle’s contract number. To access your benefit please call 844.608.4732 (producer code: 71737 plan: F).
In the event you have contracted for services on your own and not through our toll-free number, you may send those expenses to 800 Yamato Rd. STE 100, Boca Raton, FL 33431 for reimbursement consideration. Any reimbursement for services not obtained through Nation Motor Club, LLC are strictly limited to $50.00 (USA dollars).
Use the following chart to record periodic maintenance.